• Skip to main content
  • Skip to primary sidebar
  • Home
  • About
  • Recommended Readings
    • 2022 Book Reading
    • 2023 Recommended Readings
    • Book Reading 2024
    • Book Reading 2025
    • Book Reading 2026
  • Supply Chain Management Guide
  • PKM
  • Microsoft Excel
  • Microsoft Copilot in Office 365
  • Public Wiki Page

Ali Raza Zaidi

A practitioner’s musings on Dynamics 365 Finance and Operations

Tips and tricks

RDP or Business logic based SSRS Reports in Dynamics Ax 2012 R3.

July 8, 2015 by alirazazaidi

RDP or Business logic based SSRS Reports in Dynamics Ax 2012 R3.


Logic based report in MS Dynamics Ax 2012 can be develop in following steps


  1. Create a temporary table
  2. Define the report parameters
  3. Add business logic for the report
  4. Create a reporting project
  5. Bind a report to a report data provider class


In graphical shape RDP reports will be as

Code Based Report

Image Inspiration http://dynamics-ax.blogspot.com/2011/12/ax-2012-ax-ssrs-report-design-concepts.html


Now consider a scenario, where we have to display list of Item, quantity, Price and total amount sold to customers. It is relatively simple report but have to build this report based on RDP or Report Data Provider framework.


First step to open an Ax client. When Ax client open press Ctrl + shift +W keys to open Dev environment or AOT.


For all artifacts for report development will be a single place and we did not move to node to node in AOT we have to create a AX project.


You can find projects at View=>Projects => Public project.

Create a new project at and rename it with “CustomRDBReport”

ss


Step 1 create a temp table.

The major step in RDP report is decision the fields require in report, create a temp table and add these field in temp table. For current example what fields we required on report are as follow


  • CustomerAccount
  • CustomerName
  • ItemId
  • ItemName
  • SalesPrice
  • SalesQuantity
  • SalesAmount


If we see these fields exists in SalesLine Table. So we drag them into our temp table, and rename them accordingly

Right click on project and create at table with Name “CustomerSalesTemp”,

TableCreation


From property window rename the table as “CustomerSalesTemp” and set  TableType to   tempDb

TempDb


Now close all window, open AOT and opens salesLine table. From top menu click on windows => Tile and both tables comes in parallel to each other

Tiltle

and start drag and drop fields in temp table

Drag fields

Now save the table and rename the fields accordingly if required. Also add a new field with Name CustomerName with extended data Type with Name.


Right click compile and synchronize table.


Now create a AOT Query with Name QSalesLine. Add data source on SalesLine and Add following fields on Salesline table

QSalesLine


For Date Fileter, we will use ShippingDateConfirmed on Date.

Safe this query.


Step 2 define the report parameters

For current report we required three parameters, Customer, From date and To date.

In Report Data Provider framework which is based on WCF, we have to create a data contract class.

Create a new class in, rename it, CustomerSalesDataContract.

In its declaration section create three variables


[DataContractAttribute]

class CustomerSalesDataContract

{

CustAccount CustomerAccount;

TransDate FromDate;

TransDate ToDate;

}


Now Create three data method

[

DataMemberAttribute(identifierStr(CustAccount)),

SysOperationLabelAttribute (“Customer Account”),

SysOperationHelpTextAttribute(“Customer Account”),

SysOperationDisplayOrderAttribute(“1”)

]

public CustAccount  parmCustomerAccount(CustAccount  _CustomerAccount = CustomerAccount)

{

CustomerAccount = _CustomerAccount;

return CustomerAccount;

}


[

DataMemberAttribute(identifierStr(FromDate)),

SysOperationLabelAttribute (“From Date”),

SysOperationHelpTextAttribute(“FromDate”),

SysOperationDisplayOrderAttribute(“2”)

]

public TransDate  parmFromDate(TransDate  _FromDate = FromDate)

{

FromDate = _FromDate;

return FromDate;

}


[

DataMemberAttribute(identifierStr(ToDate)),

SysOperationLabelAttribute (“To Date”),

SysOperationHelpTextAttribute(“To Date”),

SysOperationDisplayOrderAttribute(“3”)

]

public TransDate  parmToDate(TransDate  _ToDate = ToDate)

{

ToDate = _ToDate;

return ToDate;

}


Step 3 Add business logic for the report.

In Report data provider framework we have to write Data provider classes, which contain business logic to populate temp table. For this we have to add create a new class “CustomerSalesDataProvider”

Extend this class SRSReportDataProviderBase


[


SRSReportParameterAttribute(classstr(CustomerSalesDataContract))

]


class CustomerSalesDataProvider extends  SRSReportDataProviderBase

{

CustomerSaleTemp _CustomerSaleTemp;

}


This Class two method, first is return the temp table, and second one is which contains the logic to populate  temp table.


[SRSReportDataSetAttribute(“CustomerSaleTemp”)]

public CustomerSaleTemp getCustomerSaleTemp()

{

select * from _CustomerSaleTemp;

return _CustomerSaleTemp;

}


public void processReport()

{

TransDate _FromDate;

TransDate _Todate;

AccountNum _CustAccount;

CustomerSalesDataContract dataContract;


Query query;

QueryRun queryRun;

QueryBuildDataSource queryBuildDataSource;

QueryBuildRange queryBuildRange;

QueryBuildRange ShippingDateConfirmedFilter;

SalesLine querySalesLine;


query = new Query(queryStr(“QSaleLine”));

dataContract = this.parmDataContract();

_CustAccount = dataContract.parmCustomerAccount();

_FromDate = dataContract.parmFromDate();

_Todate= dataContract.parmToDate();


queryBuildDataSource = query.dataSourceTable(tablenum(SalesLine));

if (_CustAccount)

{

queryBuildRange = queryBuildDataSource.findRange(fieldnum(SalesLine, CustAccount));

if (!queryBuildRange)

{

queryBuildRange = queryBuildDataSource.addRange(fieldnum(SalesLine, CustAccount));

}

}

ShippingDateConfirmedFilter = SysQuery::findOrCreateRange(query.datasourceTable(tableNum(SalesLine)),fieldNum(SalesLine,ShippingDateConfirmed));

ShippingDateConfirmedFilter.value(SysQuery::range(_FromDate,_Todate));


queryRun = new QueryRun(query); ttsbegin;

while(queryRun.next())

{ _CustomerSaleTemp.clear();

querySalesLine = queryRun.get(tablenum(SalesLine));

_CustomerSaleTemp.SalesPrice =  querySalesLine.SalesPrice;

_CustomerSaleTemp.ItemId =  querySalesLine.ItemId;

_CustomerSaleTemp.ItemDescription =  querySalesLine.Name;

_CustomerSaleTemp.SalesQty =  querySalesLine.QtyOrdered;

_CustomerSaleTemp.CustAccount =  querySalesLine.CustAccount;

_CustomerSaleTemp.CustomerName = CustTable::find(querySalesLine.CustAccount).name();

_CustomerSaleTemp.insert();


}

ttscommit;


}


Now compile the class, generate Incremental CIL.

Step 4 create a reporting project

Now open Visual studio and create Model project say “CustomSalesLineReport”.

VisualStudio

From solution explorer, create a new report rename it RDPSalesLineReport

RDPSalesLineReport


Step 5 Bind a report to a report data provider class


Now double click on report and open it in

ExpandDataSet


Add new DataSet and rename it “DSSalesLine”. On right click and from property window set Data Source Type to “Report Data Provider”


RDPSettings


And click on Query and from browser window select The data provider class we created in previous step

CustomerSalesDataProvider


Click ok to create fields

FieldsDetails


Now drag and drop data set to Design node in report to create AutoDesign.  Rename it “RDPSalesLine”


Drag and drop

Expand “RDPSalesLine” design and drag and drop CustAccount field from Data Set to Group and sort nodes

SortAndGroup


Expand parameter of report and open the property of CustAccount parameter and set its allow blank to true and nullable to true, so if no customer is selected, report will run for all customer in legal entity

CustAccountSales

Save the report compile it, deploy it and add to AOT


Now switch back to AOT.  Create a new menu Item under Display node.

Mnu


And set menu item Name as “mnuRDPSaleLine” and set its properties as follow

MnuSettings


Save it and right click on menu item and open it


Report Dialog


Set values for From Date and To date and run the report, Report will work with business logic as follow

 

Sales


An item with the same key has already been added. SSRS Dynamics Ax 2012

July 4, 2015 by alirazazaidi

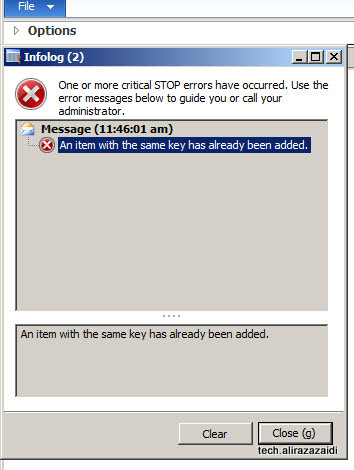
Today I got this strange error “An item with the same key has already been added “, Very interestingly I got no error during compilation or deployment of report

when I run the report I got this error

An item with the same key has already been added.


On investigate I found this error is due to meta data of report. Report is based on Query. On Exploring Query I found that I added the same field two times, At report run time I got error due to duplication of same field. If you see the below screen shoot you  will found that “CustGroup” appears two times in Query, I removed the Duplicate field. compile the Query, Refresh the report data source, compile, deploy and add to AOT. Report run successfully.


AllFields

Form Development from scratch Dynamics Ax 2012 R3 part 2

June 1, 2015 by alirazazaidi

Now we start development of form. First form we will build for Simple list form for Diagnostic table

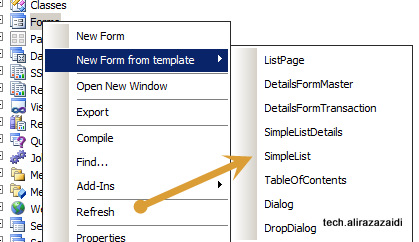
For this open AOT and right click on Form Node and click on simple list form template

SimpleListSelection


Drag newly created form in Project and rename it “DiagonasisticTable”.

DiagonasisticTableForm

Expand DiagonsisticTable form and Right click on data source node to new Data source. Update name of name and Table name as DiagonsisticTable.

DiagnonsticDataSource

Now expand Designs=> Design Expand=> group Container and select grid


Grid

Right click on grid, click on properties window and set these properties

Data Source: DiagonasisticTable

DataGroup: overView

GridProperties


Save the form and right click on form open it. The form will look like similar

NewDiagonaistic Form


If you try to enter duplicate values in Diagnostic number field. Due to unique index on Diagnostic number it did not let you do it.

DiagonistiIndexWorking


New create a display menu with Name “MnuDiagonisticTable” and set it object Type to form and object Name as “DiagonisticTable”.  Save it.

diaganostic


Now expand Diagonaistictable right click on it and set its “FormRef” property with mnuDiagonisticsTable

DiaganosticViewMnu

This property provides us option of “View Details” on lookup field. We see its function in Master detail form.


Detail form:


Now we create a detail from for patient table. Create a new form and add data source and set its Name and DataSource value to Patienttable.

patientTableForm

Right click on PatientTable data source and set “InsertIfEmpty” to false

AdmissionSource


Now expand Designs and add new action tab, inside button group add three command buttons.

Rename them into “btnNew”, “btnEdit” and “btnDelete”. And from property window set their command to new, edit and delete.

NewButton


You can also select button Image by update following Properties


New Img property

Now expand Designs=>Design under ActionTab add a new Tab. Set Tab style property to fast tab.

Add new tab page in Tab and set is width and height value as follow


Tabs


Add new group control set its width and height like above one and column property to 2.

And set is data source to patientTable and Data group property to overview

PatientGroupProperties

Now form structure will look like

PatientDetailsStructure

Now open the form let’s see how it look like

PatientDetailsgroup

Test the form and click add remove entries

PatientFormWithData


Parent child form:


Now we expand patientTable form to Parent child form.

Now expand DataSource of node of PatientTable form and add a new data source. And set its table property to AdmissionTable, Name to AdmissionTable, and Set its JoinSource to PatientTable


AdmissionSource


PasteActionTabl


Now expand the form designer and add a new tab Page under patient tab and add new action pane There Set DataSource Property of ActionTab to AdmissionTable so all control inside this action tab works for AdmissionTable. In Button group add three command buttons and set their name “BtnNewAdmission”, “BtnEditAdmission” and “BtnDeleteAdmission”. After this set  there command property  to “New”,”Edit” and “Delete”.

AdmissionButton

Now add a grid in this tab and set its data Source to AdmissionTable.

AdmissionGrid


Drag and drop fields from AdmissionTable data Source to grid

AdmissionGridFields


Now open the form lets how it look like

Our parent Child from

You can see that here admission Date is greater than Discharge Date, for this we have to add some validation rules, which are not part of current post. We let it go.

AdmissionTableGridWorks

If you right click on diagnostic number field in grid, from pop up menu view detail option leads us Diagnostic table form.

ViewDetail link


This option comes due to we add menu Item in table properties in one of above step I am again adding its picture here

DiaganosticViewMnu


Now we create a new Display Menu Item “MenuPatientTable” and set its object property to

PatientMenu


Now we create a List page for Patient and attached Patient detail form with it.


For list page template we cannot attach table in data source for this we can create a Static Query Object. This Query Object will use as data Source in Form


First we have to create a Query. Re Name it to PatientQuery and form its DataSource add Patient table

PatientQuery


Expand PatientTable source in data table and right click on fields and set its field property to yes

QueryFieldDynamicsYes


After saving you will find all fields in Query

QueryFieldDetails


Now open AOT and right click on Form Node. From pop up menu select form template and then select list page.

ListPage


Now search form with similar CopyOfSysBPStyle_ListPage Name.  Drag it to your project and rename it to PatientListPage

PatientListPage

Now expand Patient List page and set data source and sets property to PatientQuery. This query we created in previous step

PatientListPageQueryDataSource


This will result in all tables in query in forms data source. By default these table have create and edit to no.

PatientListPageTablesList

Expand Designer  node of Form and select grid and set its dataSource property to Patient and drag and drop required fields from PatientTable_1 data Source to form.


Patient list Page grid


Now drag and drop required fields from data source to grid

PatientListPageGridFields


PatientListPageWorking


Now we are going to attached PatientDetail form with Patient

Now we add the Add, edit, delete and view functionality which leads the PatientDetail form

Expand the action tab in form and right click on menuItemButton  “newbutton”

PatientListPageAddNew

Set following properties


PatientAddNewButton


Expand next button group “MaintainedGroup” and and Open property window of EditButton


PatientlistPageEditButton

From Property window set following fields

DataSource = “PatientTable_1”

OpenMode =”Edit”

CopyCallerQuery=”Yes”

MenuItemName =”mnupatientTable”

PatientListPageEditButtonProperty


Now select mnuItemButton “ViewButton”

patientListPageViewButton


From Property window and set

DataSource = “PatientTable_1”

OpenMode =”View”

CopyCallerQuery=”Yes”

MenuItemName =”mnupatientTable”


PatientListPageViewButtonProperties


Now expand grid in form and set following property to MenuItemButton “ViewButton”, which we set in above step, so when we click on grid, detail form opens

patientListPageGridProperyToOpenListViewPage


Now run the form and lets try all functions.


Now create a new Display menu Item Say “MnuPatientListPage”. Set its form Property as follow

Menufor ListPage


Suppose That is hospital registration development is part of Accounts Payable module.

MnuList

Expand the menu Accounts Payable module expand common.

Add a new menu Item or drag drop existing menu item Common Set its following properties

Menufor ListPage


Now Open Ax client and open Account Payable area page

AccountsPayableAreaPage


PatientListPageINClient


Form Development from scratch Dynamics Ax 2012 R3 part 1

June 1, 2015 by alirazazaidi

Consider a scenario where we are going to build small Hospital Admission System in Dynamics Ax 2012.  This Add-on is based on small database design based on


http://dhdurso.org/articles/ms-access-database-ad.html


db


We divide this task into two posts

For this post, we are cover following points to develop this small add-on

  • Ax Project
  • Patient, Diagnostic and admission table.
  • Simple list page for diagnostic table.
  • Entry form for Patient table (Detail form).
  • Parent Master detail form based on Patient ,Diagnostic table and patient.
  • List page for Patient table.
  • Integrate Patient List page with Patient Detail form.


AX Project:


AX Project for collecting Ax artifacts in single location.

When we create any Ax object they have to create under certain node. For example tables, forms, Classes, menu all stored in their respected node.

In Dynamics Ax we can create a Project which is not more the logical grouping of all Ax artifacts.

In these project, we create object groups and then placed our required object either drag and drop from AOT or create them here.

Advantages of Projects are

  • Logical grouping, it’s easier to locate required artifacts one location.
  • When we export project as Xpo, All objects are exported as single XPO.
  • We can export whole project into model, all object in project moved from one model to other model in single steps.


Lets make a new project


From top menu Click on View=> tools=> Project

Ax Project

Following Screen will open

Shared and Private Project

Right click on Shared folder and create a Project and renamed it to HospitalManagementSystem.


Hospital Management System Menu


New Project Managment


Click on Project and open it. Right click on it new => Group to create new groups


Details

For example we create Form group and set it Name and Project Group type to forms

Project name


Now Project is look like

Project Details


Similarly create other groups.

menu


Table structure design.


db

So our table structure look like

Diagnostic table

Column Extended data Type Primitive Data Type
DiagNo DiagnosticNumber Str10
Desc Description
Cost AmountCur Real


Patient table

Column Extended Data Type
PatNo PatientNumber Str 20
Fname Name
LName Name
BirthDate BirthDate
Address T_Address Str 20
City T_City Str20
State T_State Str20
Zip T_Zip Str20
Gender T_Gender


AdmissionsTable


Column Extended Data Type Primitive Data Type Foreign Key
AdmitNo AdmissionNumber Str20
PatNO Patient Number Patient table
Diag_code Diagnosticnumber


Diagnostic table


Adminationdate FromDate date
DischargeDate ToDate date
CoPay Notes Notes


First we create a extended data type required in three tables.

First one is DiagonisticNumber extended Data Type

Extended Data Type

Rename it and set its name as “DiagnosticNumber” and its string set its size to 10

ExtendedDataTypeSize

Similarly create all extended data type

List of Extended Data Type

Rest of we use out of the box extended Data Type

When you save any Extended Data Type, Ax ask for Synchronize database cancel it when all extended data Types created let it complete

DataBase Schyrni


In current example only gender is enum type, we create new base enum T_Gender instead of using out of box Gender enum.


Base enum menu

Create a new Enum and name it “T_Gender” t stands for training.


Right click on it and create a new element

Base Enum new Element


Set its name and label


SubType

Base Create one more element and it will look like

Base enum look like


Now create a click on tables group and right click and create a new table


Rename it to “DiagnosticTable”.

TableProperties


Now create a new field with Name “DiagNo” of string type and set its extended data type to “DiagnosticNumber”


FieldName

eeee


Similarly create all other fields in table

Diagnonstic


Now expand field Groups node in Table and Create a new Field group with Name “OverView”.

Overview

Drag all fields in it.

DiagnonsticDetial


Now want to make the Diagonistic and unique and make it primary key. For this right click and create unique index on it

DiagnonsticIndex

Rename it to DiagNoIx and set its AllowDuplicate Property to No and Alternate key to Yes

IndexDetails

Now drag DiagNo from fields node to DiagosticIdx.

Diagonisticss


Now right click on DiagnosticTable and set following Properties with newly created Index


DiagnonsticProperties


Perform same steps to create PaitentTable, create Index on “PatNo” similar way.

PatientTab


Create a new field group with overview and arrange field in a way that you want to see them in form

FieldsDetails


Create unique index on PatientNumber

PatientDetails

Similarly create AdmissionTable,

AdmissionTable


Now right click on Relation node in AdmissionTable and create a new relation and rename it to “PatientRelation” and sets its table property to “PatientTable”

PatientRelationDetails

Now Right click on relation click on new =>ForeignKey=>Single field AlternateKey based

AlterNativeField


A new field added against  relation, rename it to PatientNumber

PatientKey


Similarly create another key based DiagnosticTable

AdmissionTableWithRelation


Save and compile all table and synchronize each table.


Form development will be on next post

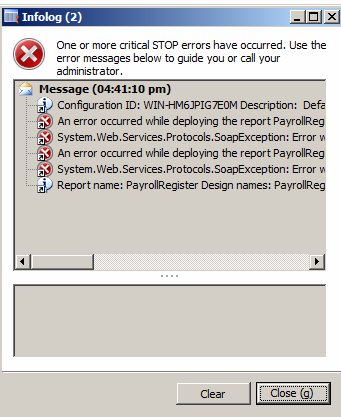
Microsoft.Dynamics.Framework.Metadata.AX, Version=6.2.0.0 SSRS Report Error

June 1, 2015 by alirazazaidi

Today I got very this error on deployment of customized SSRS report. The customization code was written in Dynamics AX 2012 R2 and it was successfully migrated to Dynamics Ax 2012 R3


System.Web.Services.Protocols.SoapException: Error while loading code module: ‘Microsoft.Dynamics.Framework.Metadata.AX, Version=6.2.0.0, Culture=neutral, PublicKeyToken=31bf3856ad364e35’. Details: Could not load file or assembly ‘Microsoft.Dynamics.Framework.Metadata.AX, Version=6.2.0.0, Culture=neutral, PublicKeyToken=31bf3856ad364e35’ or one of its dependencies. The system cannot find the file specified.

at Microsoft.ReportingServices.Library.ReportingService2005Impl.CreateReport(String Report, String Parent, Boolean Overwrite, Byte[] Definition, Property[] Properties, Guid batchId, Warning[]& Warnings)

at Microsoft.ReportingServices.WebServer.ReportingService2005.CreateReport(String Report, String Parent, Boolean Overwrite, Byte[] Definition, Property[] Properties, Warning[]& Warnings)


ReportError

Solution is open the report In Visual studio, compile it, deployed it and add to AOT.

List of user under certain Role Dynamics Ax 2012

May 26, 2015 by alirazazaidi

Consider a real time scenario, where we have to send alerts to all user in certain Role In Dynamics.

For this purpose we have to loop through all user in certain role.

User, roles and role assignment are done three tables, these tables are hidden in AOT.


These table are

UserInfo : This table holds all User Ids In Dynamics Ax 2012.

SecurityRole : This table hold all Security Roles, In this table has two important fields “Name” which is descriptive and second one is AOTName. If you get the current customer assigned role using then this AOTName will be return.

SecurityUserRole: This table holds many to many relation with security and User.


For below snippet, I loop through all user assigned in Sales Representative.


   static void RoleUSerID(Args _args)

{

UserInfo    userInfo;

SecurityUserRole securityUserRole;

SecurityRole       Roles;


while select userInfo

join securityUserRole

where securityUserRole.User == userInfo.Id

join Roles where Roles.RecId  == securityUserRole.SecurityRole

&& Roles.AotName ==”TradeSalesRepresentative”

{

info(userInfo.Id);

}


internal server error 500 in enterprise portal dynamics ax 2012

May 20, 2015 by alirazazaidi

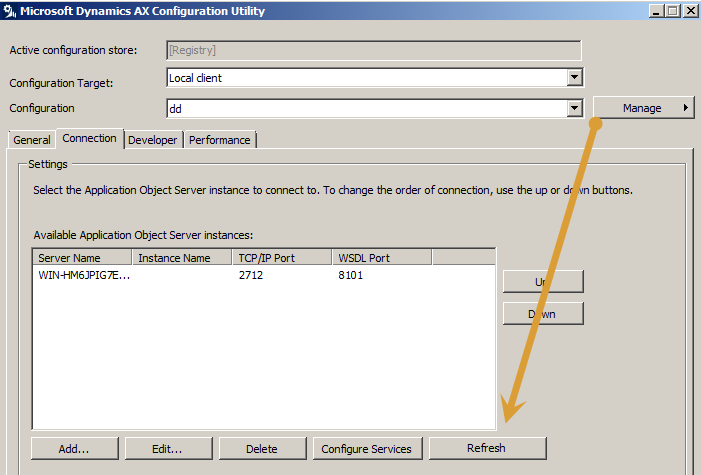
There are several reasons for internal server Error 500,  But today i was facing this error in local deployment of enterprise portal. Previously enterpise portal works perfectly fine. I solve it in two steps

  1. Restart the IIS.
  2. Regenerate the WCF configuration By clicking on refresh button  from Dynamics Ax Server configuration. Following screenshot will help you.

Regergenerationing


Hopes this helps.


How to get time difference between two different time values (TimeEdit control) in MS Dynamics Ax 2012

May 14, 2015 by alirazazaidi

Today I got change to work with timeedit control in Ax where we have to get input of time and then take difference to get number of hours.

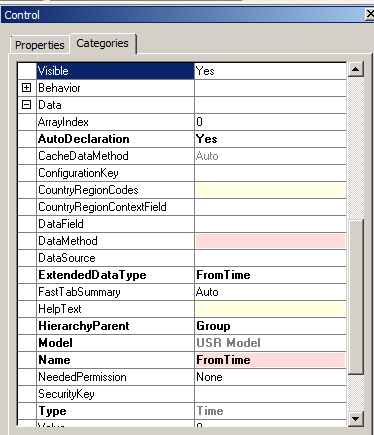
For this example I used timeEdit control and add two timeEdit control in form.These timeEdit controls are unbound, I set the out of the box FromTime and ToTime extended data Type and set auto declaration property to true so these controls can be access by name in code.

TimePropertiesInAx

Similarly set the properties ToTime.


Now add button and add its click method. The time difference between two times value can be get with timeConsumed out of the box function.


void clicked()

{


super();


info(timeConsumed(txtFromTime.value(),txtToTime.value()));

}

5-15-2015 12-19-11 AM

output is as

5-15-2015 12-19-25 AM


endtime


out put is as


5-15-2015 12-19-51 AM

unchecked’ cannot be called on the client Dynamics Ax 2012 R3

May 6, 2015 by alirazazaidi

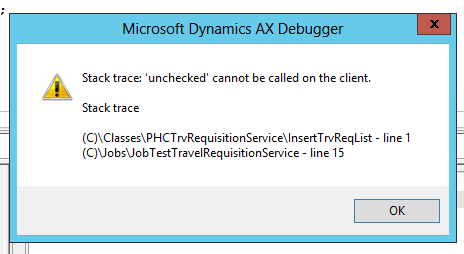
Today  I was debugging the logic written for Custom AIF services  using X++ job before deploy it as AIF service, I got strange error


“Stack trace: ‘unchecked’ cannot be called on the client.”. 


5-6-2015 2-30-14 PM


It was due that Service class was set as run  at “Called from”, Only solution is to change run at to Server. Job will successfully run.

5-6-2015 2-30-53 PM

Deploy and configure Dev/ Test Retail essential environment on Azure Dynamics Ax 2012 R3 Part 1

May 3, 2015 by alirazazaidi

Dev and test Retail essential is single VM based environment, On which everything need for Retail customization is available.  Yesterday I successfully configured for me. following are some step by step notes for its deployment and configuration.


Login in on following link to login in you Lifecycle services for Dynamics. For this you must have partner source or customer source credentials

https://lcs.dynamics.com/Logon/Index?redirectUrl=https%3A%2F%2Flcs.dynamics.com%2F%3Flc%3D1033

Lcs


After successful login create a new Project.


For Example I created a new project “Azure On Ax” with following configuration

Create Ax

New Project

Now go on at new Azure based environment a click on this. Here add Guid for you Azure subscription.

New Azure deployment

Click on next button.

4-28-2015 11-42-36 PM

Click on download button to download the certificate and now login in your azure from Azure management portal.

4-28-2015 11-44-33 PM

From setting menu, upload the certificate.


sss


ss

Now go back to Life cycle services page and click on next button.

4-28-2015 11-42-36 PM

Select location.

4-28-2015 11-49-07 PM

Click on Test / dev environment because we want test and dev environment.


4-28-2015 11-49-28 PM

From Advanced menu you can change environment form Dynamics Ax 2012 R3 CU8 to Dynamics AX 2012 R3. By default it will configure the Dynamics Ax 2012 R3.

dev


sqq

Wait it to deployment complete.


When Vm deployed, in Life cycle services you will find user name and password.

Login

I am more Interested in work with axlocalAdmin user so I want to make axlocalAdmin as system administrator ,  You can skip the following step.

If you saw in above picture you find that DynamicsInstallUser is built in user is used to configure the AX.


Login with SQL server user in VM and set axlocalAdmin as System Administrator In AX.

Run the PowerShell and run the following command.


So create user as log in with following command


$AdObj = New-Object System.Security.Principal.NTAccount(“axlocaladmin”)


$strSID = $AdObj.Translate([System.Security.Principal.SecurityIdentifier])


$strSID.Value

This command return the SID id of axlocalAdmin.


Copy the sid id update the following command and open the Dynamics Ax database in SQL server and run the update sql command.


update userinfo set

networkdomain = ‘contoso’,


networkalias = ‘dynamicAdmin’,


name = ‘axlocaladmin’


SID = ‘S-1-5-21-602381161-1523875512-907902364-500’


where ID = ‘Admin’


Now back login in with axlocaladmin

And first step to compile the Dynamics Ax with AX build command. For this


Open cmd run as administrator

axbuild.exe xppcompileall /s=01 /altbin=”C:\Program Files (x86)\Microsoft Dynamics AX\60\Client\Bin” /log:”C:\Temp”

axbuild.exe found at following location


C:\Program Files\Microsoft Dynamics AX\60\Server\MicrosoftDynamicsAX\bin

Build


”


When above step is successfully completed.

Open AX and complete the Initialization check list.

4-29-2015 10-29-14 AM


When Initialization check list is complete, Again log in with SQL server User and inject the demo data.


On Ax environment testTransfterTool found following location.

F:\TestTransferTool


Demo data files path is as

G:\DemoData


Stop the AOS services and run the following command.


“dp.exe import D:\DemoData MicrosoftDynamicsAx”


When data import completed. Login back axloginAdmin


And start configuring retail features.


Now go to retail sessional area page. If Retail essential area page enabled it. From File => Module=> Retail essentials.


Retail Parameters

Retail essentials => channels => retail parameters

Parameters


Retail parameter


From top menu click on Initialize

4-29-2015 10-55-41 PM


wait until info log show up

4-22-2015 1-03-28 AM


Retail subject


Retail Scheduler parameters:


No click on Data synchronization => setup =>Retail Scheduler parameters

4-29-2015 11-28-12 PM


In the next open screen, set following things

  • Server Name
  • Sync meta data button at the top of the form

Enter Sync metadata button and  click on yes to confirm it


Sychn


Real time services profiles setup:

4-30-2015 12-44-44 AM


Set server name and common name and close the form.

ss222


Working folder:

workingFolder

You can set download and upload folder. But as per documentation they are as follow.

And set download and upload folder as per following By default these are something like

C:\DemoFiles\Retail\CDX\Download.

C:\DemoFiles\Retail\CDX\Upload.


Paths


Now go to setup the Channel database

Retail database


As per MSDN select Houston and click on Full data Sync and select 9999 and click ok on it.


database 9999


Reference :  https://technet.microsoft.com/EN-US/library/dn798905.aspx

« Previous Page
Next Page »

Primary Sidebar

About

I am Dynamics AX/365 Finance and Operations consultant with years of implementation experience. I has helped several businesses implement and succeed with Dynamics AX/365 Finance and Operations. The goal of this website is to share insights, tips, and tricks to help end users and IT professionals.

Legal

Content published on this website are opinions, insights, tips, and tricks we have gained from years of Dynamics consulting and may not represent the opinions or views of any current or past employer. Any changes to an ERP system should be thoroughly tested before implementation.

Categories

  • Accounts Payable (2)
  • Advance Warehouse (2)
  • AI (3)
  • Asset Management (3)
  • Azure Functions (1)
  • Books (6)
  • Certification Guide (3)
  • ChatGPT (3)
  • Claude (1)
  • Customization Tips for D365 for Finance and Operations (64)
  • D365OF (60)
  • Data Management (1)
  • database restore (1)
  • Dynamics 365 (59)
  • Dynamics 365 for finance and operations (139)
  • Dynamics 365 for Operations (175)
  • Dynamics AX (AX 7) (134)
  • Dynamics AX 2012 (274)
  • Dynamics Ax 2012 Forms (13)
  • Dynamics Ax 2012 functional side (16)
  • Dynamics Ax 2012 Reporting SSRS Reports. (31)
  • Dynamics Ax 2012 Technical Side (52)
  • Dynamics Ax 7 (65)
  • Exam MB-330: Microsoft Dynamics 365 Supply Chain Management (7)
  • Excel Addin (1)
  • Favorites (12)
  • Financial Modules (6)
  • Functional (8)
  • General Journal (1)
  • Implementations (1)
  • Ledger (1)
  • Lifecycle Services (1)
  • Logseq (4)
  • Management Reporter (1)
  • Microsoft Excel (4)
  • MS Dynamics Ax 7 (64)
  • MVP summit (1)
  • MVP summit 2016 (1)
  • New Dynamics Ax (19)
  • Non Defined (9)
  • Note taking Apps (2)
  • Obsidian (4)
  • Personal Knowledge Management (3)
  • PKM (16)
  • Power Platform (6)
  • Procurement (5)
  • procurement and sourcing (6)
  • Product Information Management (4)
  • Product Management (6)
  • Production Control D365 for Finance and Operations (10)
  • Sale Order Process (10)
  • Sale Order Processing (10)
  • Sales and Distribution (5)
  • Soft Skill (1)
  • Supply Chain Management D365 F&O (5)
  • Tips and tricks (278)
  • Uncategorized (165)
  • Upgrade (1)
  • Web Cast (7)
  • White papers (4)
  • X++ (10)

Wiki

  • SCM

Copyright © 2026 · Magazine Pro On Genesis Framework · WordPress · Log in