• Skip to main content
  • Skip to primary sidebar
  • Home
  • About
  • Recommended Readings
    • 2022 Book Reading
    • 2023 Recommended Readings
    • Book Reading 2024
    • Book Reading 2025
    • Book Reading 2026
  • Supply Chain Management Guide
  • PKM
  • Microsoft Excel
  • Microsoft Copilot in Office 365
  • Public Wiki Page

Ali Raza Zaidi

A practitioner’s musings on Dynamics 365 Finance and Operations

Tips and tricks

Unable to preview the report, install the Business Intelligence Dynamics Ax 2012

December 6, 2015 by alirazazaidi

A few days ago, I had to modify reports in standard Dynamics Ax 2012 R3. Report successfully opened in Visual studio 2010, but when I tried to modify the report design, visual studio throw following error.

Unable to preview the report, install the Business Intelligence. Development Studio feature.

2015-11-29_9-59-09

For this I had to install the Business Intelligence Development Studio from SQL Sever 2008 R2 setup.

2015-11-29_17-14-13

After Installment this error resolved.

Reference: http://msdynamicsaxtips.blogspot.com/2015/02/unable-to-preview-report-install.html


How to handle empty pages in SSRS report dynamics Ax 2012

November 30, 2015 by alirazazaidi

Today I was facing the report issue that it print three blank pages other than one require page. This issue is due to page body is covering more area then print page size. During development phase we test the print page size by saving the report review as pdf. Followings is the tip which helps me to remove empty white pages from report print.

Check that page size and set it also set the you want print in portrait or landscape.

For example if I have to run the report on A4 and portrait form. Then I will perform following steps to set the print page setting and size of report page.

Right click on gray area of report and click on report properties.

2015-11-30_22-44-15


And set the report print and size and also set left and right margins

Page Size


Now note the page size is 8.27. We have to check report body size and it must be less than 8.27 inch. For this right click on White area in report canvas and press f4.

Body Size detail


From property window you can check it body size. If it larger then 8.27 in, then you must reset the table, tablix and matrix to and resize the body to less then 8.27.

resize


Now check rerun the report and save its preview in pdf.


Invent Journal and its relation with Voucher sequence number Dynamics Ax 2012 R3

November 18, 2015 by alirazazaidi


X++ code for these Invent transfer and movement journal is available in different blogs and website. The voucher number for these entries is little bit tricky. This Voucher Number is set InventJournalName as fellow screen.

xyz

By writing this simple tip I used out of demo vm with contoso data.

So If expand the InventJounralName table we will find this voucher sequence number set in VoucherSequenceNumberTable field.

VoucherSequenceNumber

If we expand the Relation node of InventJournalName table we find its relationship with Sequence Number table based on RecId.

ReleationShip

For getting next voucher Number for Journal lines we have to use static method of NumberSeq  as


InventJournalName   inventJournalName;

NumberSeq     _sequence;

num _voucher;

select firstOnly inventJournalName

where inventJournalName.JournalType == InventJournalType::Any

ttsBegin;

_sequence=   NumberSeq::newGetNumFromId(   inventJournalName.VoucherNumberSequenceTable);

_voucher=_sequence.num();

ttsCommit;

Required date must not be before today’s date Validation Dynamics Ax 2012

November 12, 2015 by alirazazaidi

Today I got very small task to remove date validation. This validation appear in out of the box and did not let create functionality for previous dates. Surprisingly I did not find any validation code in form. Later I discover that at table level  validation logic was written in function “validateField(FieldId _fieldIdToCheck)”.

Custom Workflow from scratch, Dynamics Ax 2012

October 21, 2015 by alirazazaidi

Let start work on fake requirement. Suppose we are working in HR module and client wants that worker will add their expense and send for Approval.


For this requirement, first we create a custom table and create its relation with Worker table. And then develop a custom workflow on it.

So this post contains tasks

  • Table creation and relation with worker
  • Create a simple entry form and list page.
  • Workflow


So first we create a new table and generate its relation with Worker ID.


If we open HCMworker table we will find that its primary key is “PersonnelNumber”.


We add new enum type which has expected values, medical, Certification, Food expense and others. We use Tst as extension for our example’s artifacts.

Expense


Now create a new table set its Name as tstWorkerExpenseTable.

Expand table node and right click on relation node. Create a new and set table as HCMWorker.


Rightlick on it new => foreignKey=>Primarykey.

HcmWorker

You will find new and new field added, you can rename it, if you check the properties you will the  which will int64 bit.


Now drag and drop enum created in previous step

Rename it to Expense type.


Now add one more field name It Amount of real type and set its label as Amount

Save It. Also create a field group with overview and drag all fields in that group.

Table final structure will be as follow.

Table Final stage


Form create simple form with Name tstWorkerExpense and set its data source as

Now create a simple form and set its datasource as TstWorkerExpense. And set data source properties  “Edit” and “insert if empty” to no.


Add grid on form and drag and drop fields from data source to grid. Save it.  Form structure will be look like.

WorkerListPage


Run the form you will find something like. You can improve from. It is enough for our current example

Also insert command buttons on action table for new, Edit and delete.

CreateForm


You can improve but for current example it is enough.


Now create a new enum  for which will used as approval status for table.

WorkFlowStatus

Drag and drop in fields of tstWorkerExpense. Save table, compile and synchronize, so this will be reflect at SQL Server level.


Now Its time to write some code that will work for state change in workflow steps.

Right click on Method node on tstWorkerExpense and click on CanSubmitToWorkFlow

CanWorkflow


Update it as follow.


publicboolean canSubmitToWorkflow(str _workflowType = ”)

{

boolean ret;


if (this.ExpenseStatus ==tstExpenseStatus::NotSubmit)

{


ret = boolean::true;

}

else

{

ret =boolean::false;

}


return ret;

}


New add a new static method with Name “updateworkFlow” and update it as follow


publicstaticvoid updateWorkFlowState(RefRecId _id, tstExpenseStatus _status)

{

tstWorkerExpense _Expense;


selectforUpdate _Expense where _Expense.RecId ==_id;

if (_Expense !=null)

{

ttsBegin;

_Expense.ExpenseStatus = _status;

_Expense.update();

ttsCommit;

}

}


Now create a Query and This query will later used when we build Workflow type on it.

Query

Add TstWorkerExpense table in it and set field  dynamic to yes.


WorkflowQuery

Now expand AOT and expand workflow right click on new Workflow Category

Custom Cateogry

Set its name tstWorkFlowCategory and set Module as HumanResource.

CategoryDetail

Save it. Now add a new me display menu Item With name “tstExpenseTable” and set its form tstWorkerExpenseTable.

Menu Item


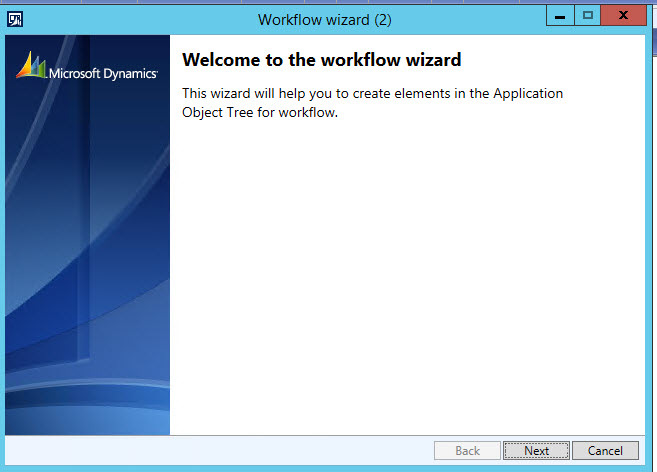
Now expand workflow and then expand workflow Type right click and run the wizard.

WorkFlowType Wizard

Wizard1


From next window set following properties all based on artifacts we create in pervious steps.

ExpenseWizard

Ie.  Query, workflow category and menu item.  AS we test this workflow only on Ax client so check on rich client

TypeWizardFinished

Click on next.


In result a new Ax Project is created

TypeProject

  • Workflow Type
  • Classes
    • Document class which extends WorkflowDocument.
    • EventHandler class which gives implementation to handle different workflow events.
    • SubmitManager class.
  • Action menu items:
    • SubmitMenuItem pointing to SubmitManager class.
    • CancelMenuItem pointing to WorkflowCancelManager class.


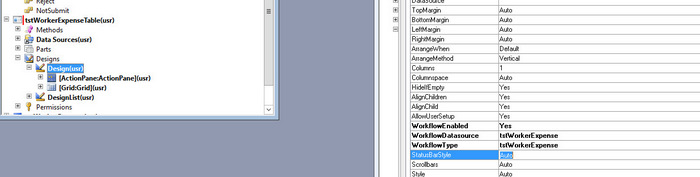
Now expand the form (We created this in one above step) and expand its design, and set following properties  to it will workflow enable

WorkflowEnabled =yes

WorkflowDataSorce =tstWorkFlowExpense

WorkflowType = tstWorkerEpense (We created this in previous step).

WorkFlowSettings


Now expand submit manager class in workflow type project and update logic as follow.

And Create a new method with following logic.


public void submit(Args _args)

{

CustTable                           CustTable;
   CustAprWorkflowTypeSubmitManager    submitManger;   
   recId _recId =                      _args.record().RecId;
   WorkflowCorrelationId               _workflowCorrelationId;


   workflowTypeName                    _workflowTypeName = workFlowTypeStr(“CustAprWorkflowType”);
   WorkflowComment                     note = “”;
   WorkflowSubmitDialog                workflowSubmitDialog;
   submitManger =                      new CustAprWorkflowTypeSubmitManager();


   //Opens the submit to workflow dialog.
   workflowSubmitDialog = WorkflowSubmitDialog::construct(_args.caller().getActiveWorkflowConfiguration());
   workflowSubmitDialog.run();


   if (workflowSubmitDialog.parmIsClosedOK())
   {
       CustTable = _args.record();
       // Get comments from the submit to workflow dialog.
       note = workflowSubmitDialog.parmWorkflowComment();


       try
       {
           ttsbegin;
           // Activate the workflow.
           _workflowCorrelationId = Workflow::activateFromWorkflowType(_workflowTypeName, CustTable.RecId, note, NoYes::No);


           CustTable.WorkflowApprovalStatus = CustWFApprovalStatus::Submitted;
           CustTable.update();
           ttscommit;


           // Send an Infolog message.
           info(“Submitted to workflow.”);
       }
       catch (Exception::Error)
       {
           error(“Error on workflow activation.”);
       }
   }


   _args.caller().updateWorkFlowControls();

}


Now Create a we create workflow approval.

Expand Workflow node in AOT and then again expand Workflow approval.

Approval


Now you have to use the following artifacts we created in previous steps.


Document, which we created through workflow type wizard and tables field group. And

ApprovalWithDocument


Again new project created.

New Approval Project is created


Now expand TsWorkerExpenseAppEventHandler and update following methods.

public void returned(WorkflowElementEventArgs _workflowElementEventArgs)

{

tstWorkerExpense::updateWorkFlowState(_workflowElementEventArgs.parmWorkflowContext().parmRecId(), tstExpenseStatus::ChangeRequest);

}


public void changeRequested(WorkflowElementEventArgs _workflowElementEventArgs)

{

tstWorkerExpense::updateWorkFlowState(_workflowElementEventArgs.parmWorkflowContext().parmRecId(), tstExpenseStatus::ChangeRequest);

}


public void denied(WorkflowElementEventArgs _workflowElementEventArgs)

{

tstWorkerExpense::updateWorkFlowState(_workflowElementEventArgs.parmWorkflowContext().parmRecId(), tstExpenseStatus::Reject);

}


public void completed(WorkflowElementEventArgs _workflowElementEventArgs)

{

tstWorkerExpense::updateWorkFlowState(_workflowElementEventArgs.parmWorkflowContext().parmRecId(), tstExpenseStatus::Approve);

}


public void canceled(WorkflowElementEventArgs _workflowElementEventArgs)

{

tstWorkerExpense::updateWorkFlowState(_workflowElementEventArgs.parmWorkflowContext().parmRecId(), tstExpenseStatus::Cancel);

}


public void started(WorkflowElementEventArgs _workflowElementEventArgs)

{

tstWorkerExpense::updateWorkFlowState(_workflowElementEventArgs.parmWorkflowContext().parmRecId(), tstExpenseStatus::Submit);

}


Now expand the workflow and in sub node Supported Elements, drag and drop approval artifact.

Support


Drag

WorkFlowElement


Now create a new menu item and set its form and set its following properties.

WorkFlowMenuItem

  • Form WorkflowTableListPage
  • EnumTypeParameter to ModuleAxapta
  • EnumParameter to Basic.


Now generate increment CIL. It is necessary step.


Click on this and open the workflow design.


Navigate to the menu item to open WorkflowTableListPage to design the workflow.

Click on new button.

WorkFlowScreen


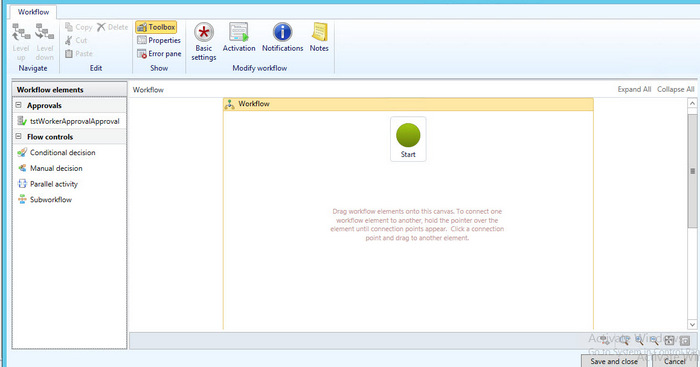
Drag and drop approval on designer screen and. Link the start to shape and from shape to end .


WorkFlow


Current user and its employee Name and department

October 19, 2015 by alirazazaidi

Today I got small requirement where I have to pick and display current log in user Name, Following code snippet helps me

static void curUserInfo(Args _arg)
{
    str sUserId;
Name  name;
str departmentName
;

    ;
    sUserId = curUserId();
    info( "Current user ID is " + sUserId );
name= HcmWorker::find(DirPersonuser::findUserWorkerReference(sUserId)).name();
 departmentName=    HcmWorker::find(DirPersonuser::findUserWorkerReference(sUserId)).primaryDepartmentName();
info ("Name is " + name);

}

How to enable debugging on Server 2012 R3.

October 14, 2015 by alirazazaidi

Usually we have to debug on server, while debugging option is not enabled. Right way to enable it from AX server configuration utility, but some Ax server configuration utility needs is on default setting and any setting on Configuration utility is un-Affordable due AOS service going to restart.

On other way is to enable debugging option through Window registry. It helps me to enable debugging on server without restart of AOS server.

Windows => run write REGEDIT

Expand  HKEY_LOCAL_MACHINE => MICROSOFT

2015-10-14_20-56-39

Dynamic => 6.0 =>configuration => Original (install configuration) => xppdebug

2015-10-14_20-58-15

Set xppdebug to zero

2015-10-14_20-58-43


reference :http://blogs.msdn.com/b/cesardelatorre/archive/2008/01/05/how-to-enable-debugging-on-server-dynamics-ax.aspx

One or more project in the solution were not loaded correctly SSRS Dynamics Ax 2012 R2.

October 12, 2015 by alirazazaidi

Today I got an error when I try to edit customize SSRS report project on environment which I first time use.


“One or more project in the solution were not loaded correctly. Please see the Output Window for details”


Visual studio project opens but report did not load, Application Explore shows the message that

AOS is not connected.


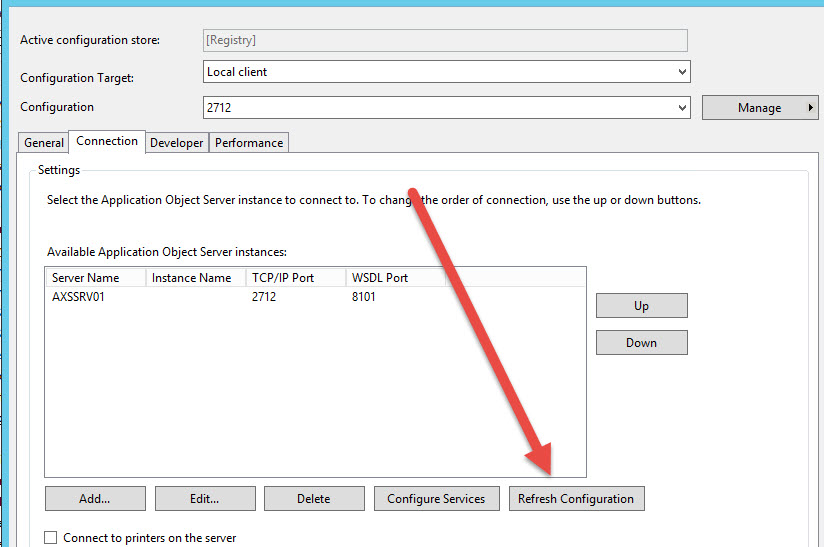
For this I open the control panel, Administrative tools and then open Microsoft Dynamics Ax 2012 Configuration

Configurations


Click on Refresh Configuration.


After a few second, I edit the visual studio project, it perfectly open.

Out of box Workflow tables and relation with Document table Dynamics Ax 2012

October 5, 2015 by alirazazaidi

A few days ago I got chance to work on list page which contains the lines which are assign to current user or login user for approval.

In Dynamics Ax 2012, every workflow is based on some table. Here we create Query and enable workflow on it.

When any record is submit for approval. So how the other Dynamics Ax 2012 workflow create entries in out of the box workflow tables.  If we open AOT there a lot of table which is used by Workflow engine.

WorkFlowTables


For current requirement we have to create custom query which is based on document table and out of the box workflow table. But problem is there too much table and how to understand relation ship between tables.


In Dynamics Ax, when no solution available then best solution is reverse engineering. Explore what Microsoft already did, try to understand it and then create your own solution.


After exploring I found that in procurement module there is “Purchase requisition assign to me” list page where the similar task is done by Microsoft itself.


This list page is based on AOT /Static Query “PurchReqTableAssignedToMe”.

Requisiation AssignToMe

On expanding I found relationship between following tables.


-Document table current example it is PurchReqTable

-SysworkFlowTable (as parent or Header table).

-SysWorkFlowTable ( as child or line table).

-WorkflowWorkItemTable.

purch Assign to me


You can explore this query in more detail and replicate this with respect to required table on your workflow based and use this query in list page.

In this form you have to set design properties to enable it for workflow. For example current PurchRequistionAssignToMe list page has following properties.

WorkFlowEnabled


Hope this helps


Field ‘abcd’ in table ‘CompanyInfo’ has not been explicitly selected Dynamics Ax 2012 R3.

September 17, 2015 by alirazazaidi

Today we face an error on our client environment that when we run the report Customer Account Statement shows error in info box as.

Stack trace: Field ‘abcd’ in table ‘CompanyInfo’ has not been explicitly selected.

Stack trace

(C)\Classes\CustAccountStatementExtController\setCommonData – line 29

(C)\Classes\CustAccountStatementExtController\runPrintMgmt – line 76

(C)\Classes\SrsPrintMgmtController\run – line 14

(C)\Classes\SysOperationController\startOperation – line 10

(C)\Classes\SrsReportRunController\startOperation – line 12

(C)\Classes\SrsPrintMgmtController\startOperation – line 14

(C)\Classes\SrsPrintMgmtFormLetterController\startOperation – line 14

(C)\Classes\CustAccountStatementExtController\main – line 6


After searching I found reply on Dynamics Ax forum by André Arnaud de Calavon where he gave the link Dick Wenning post, Hat off for them.

http://www.axstart.com/unretrieved-values-on-the-companyinfo-table-in-ax-2012r2/


Problem was in company info table value of “abcd” is null, and by unknown reason Ax did not recognize null value and show as Un retrieve. Due to this error report did not works. I found there are many other fields’ in a row are un-retrieve.


Solution open Sql server and run update query on Dynamics Ax 2012 Database ie. MSDynamicsAX or it depends on installation of Dynamics Ax 2012,


Update table CompanyInfo set “abcd”=”” where Name =”us01”.


Cheers, report run successfully.


« Previous Page
Next Page »

Primary Sidebar

About

I am Dynamics AX/365 Finance and Operations consultant with years of implementation experience. I has helped several businesses implement and succeed with Dynamics AX/365 Finance and Operations. The goal of this website is to share insights, tips, and tricks to help end users and IT professionals.

Legal

Content published on this website are opinions, insights, tips, and tricks we have gained from years of Dynamics consulting and may not represent the opinions or views of any current or past employer. Any changes to an ERP system should be thoroughly tested before implementation.

Categories

  • Accounts Payable (2)
  • Advance Warehouse (2)
  • AI (3)
  • Asset Management (3)
  • Azure Functions (1)
  • Books (6)
  • Certification Guide (3)
  • ChatGPT (3)
  • Claude (1)
  • Customization Tips for D365 for Finance and Operations (64)
  • D365OF (60)
  • Data Management (1)
  • database restore (1)
  • Dynamics 365 (59)
  • Dynamics 365 for finance and operations (139)
  • Dynamics 365 for Operations (175)
  • Dynamics AX (AX 7) (134)
  • Dynamics AX 2012 (274)
  • Dynamics Ax 2012 Forms (13)
  • Dynamics Ax 2012 functional side (16)
  • Dynamics Ax 2012 Reporting SSRS Reports. (31)
  • Dynamics Ax 2012 Technical Side (52)
  • Dynamics Ax 7 (65)
  • Exam MB-330: Microsoft Dynamics 365 Supply Chain Management (7)
  • Excel Addin (1)
  • Favorites (12)
  • Financial Modules (6)
  • Functional (8)
  • General Journal (1)
  • Implementations (1)
  • Ledger (1)
  • Lifecycle Services (1)
  • Logseq (4)
  • Management Reporter (1)
  • Microsoft Excel (4)
  • MS Dynamics Ax 7 (64)
  • MVP summit (1)
  • MVP summit 2016 (1)
  • New Dynamics Ax (19)
  • Non Defined (9)
  • Note taking Apps (2)
  • Obsidian (4)
  • Personal Knowledge Management (3)
  • PKM (16)
  • Power Platform (6)
  • Procurement (5)
  • procurement and sourcing (6)
  • Product Information Management (4)
  • Product Management (6)
  • Production Control D365 for Finance and Operations (10)
  • Sale Order Process (10)
  • Sale Order Processing (10)
  • Sales and Distribution (5)
  • Soft Skill (1)
  • Supply Chain Management D365 F&O (5)
  • Tips and tricks (278)
  • Uncategorized (165)
  • Upgrade (1)
  • Web Cast (7)
  • White papers (4)
  • X++ (10)

Wiki

  • SCM

Copyright © 2026 · Magazine Pro On Genesis Framework · WordPress · Log in