• Skip to main content
  • Skip to primary sidebar
  • Home
  • About
  • Recommended Readings
    • 2022 Book Reading
    • 2023 Recommended Readings
    • Book Reading 2024
    • Book Reading 2025
    • Book Reading 2026
  • Supply Chain Management Guide
  • PKM
  • Microsoft Excel
  • Microsoft Copilot in Office 365
  • Public Wiki Page

Ali Raza Zaidi

A practitioner’s musings on Dynamics 365 Finance and Operations

Customization Tips for D365 for Finance and Operations

How to open external URL in D365 For finance and operations MSDyn365FO

September 17, 2018 by alirazazaidi

Small tip, follow these steps, 

Create a run able class in Visual studio.

in its main method write following line of code


Browser br = new Browser();
br.navigate(“https://www.tech.alirazazaidi.com, true);

Create a action menu.

Set its object type to class and set object with runnable class name.

Add this menu item to required menu extension. Save compile

On clicking menu item from navigation. A popup windows open, Allow popup option allow.

Line level Charges Sales Order Processing Dynamics 365 for finance and operations

September 9, 2018 by alirazazaidi

Hi all, here is another youtube video. I used to explore things and  them document. Here I documented line level charges on sales order applied based on customer charges group and Item Charges group. English is not my native language so bear with me. 

Disable export to Excel Customization D365 for finance and operations

August 27, 2018 by alirazazaidi

We can disable the export to Excel option in list pages, There is option on grid properties “Export to Excel”. Its by default true. By changing it to false disable export to excel on specific form.

Sale Order Processing Part 2 Product and Product Category Creation Video- D365 For Finance and Operations

July 18, 2018 by alirazazaidi

Notes about Labels D365 for Finance and operations.

March 14, 2018 by alirazazaidi


Suppose we are doing customization or new development from scratch. We need labels for our control, forms, fields for display caption or titles.


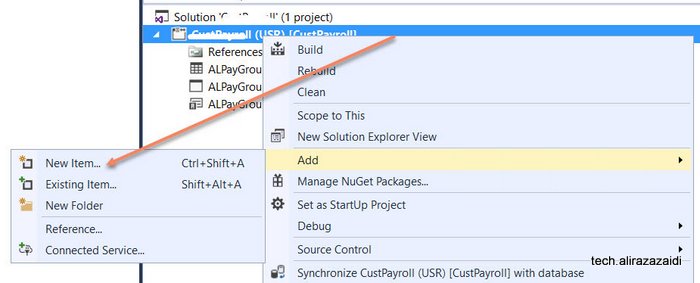
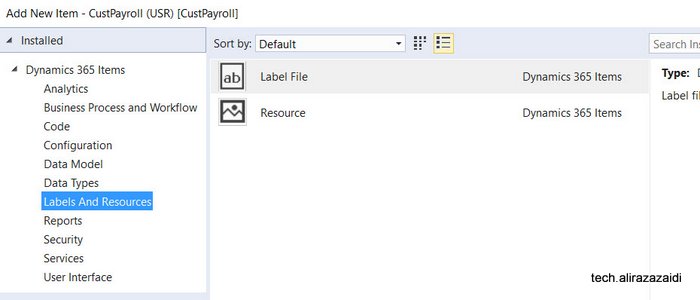
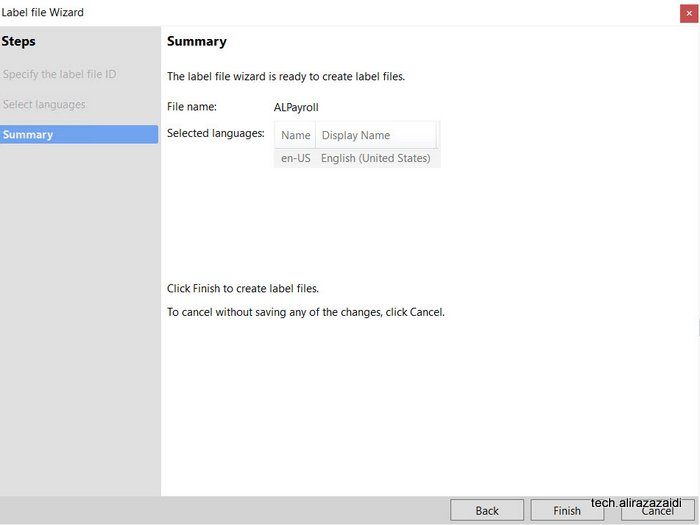
So first step is to create it by adding new item in Visual studio.


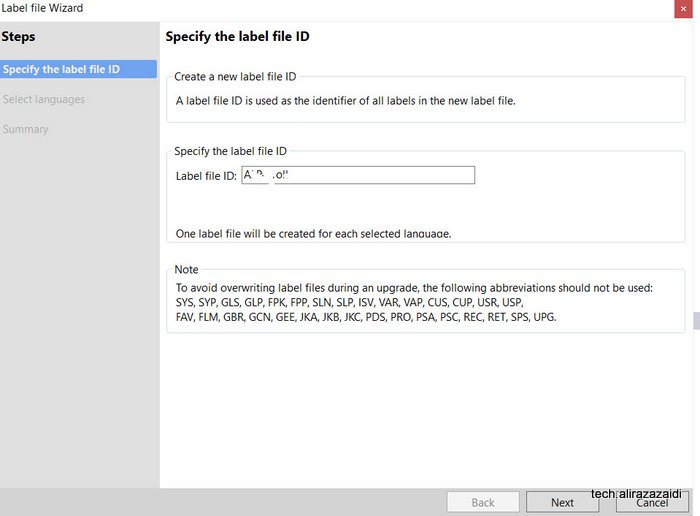
Name it as required,


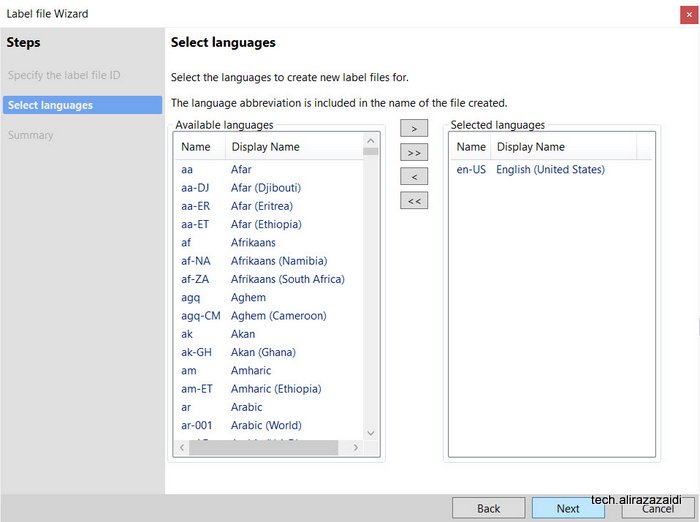
Select language. I select the English “US”


Make it finish


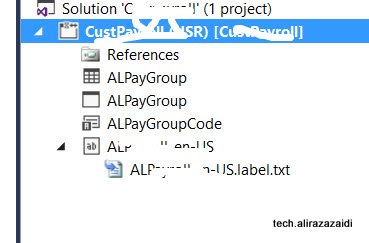
As a result new  label file is created in visual studio solution


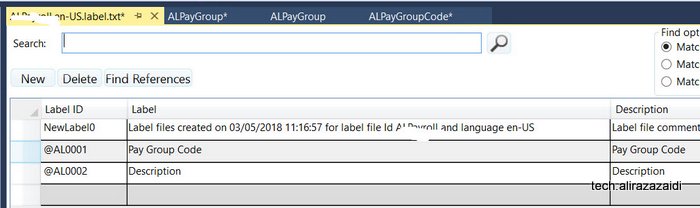
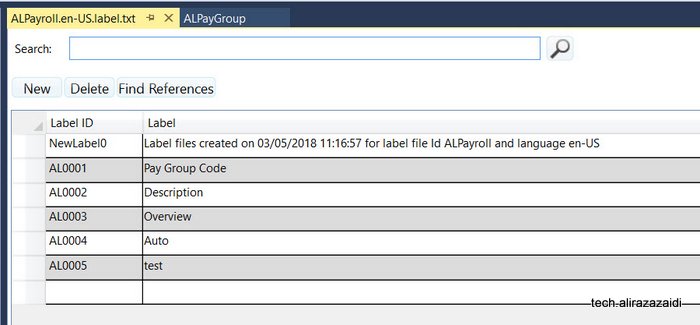
Click on file and add values through editors.


Labels created here can be search at control, field, EDT and Enum can be searched and used


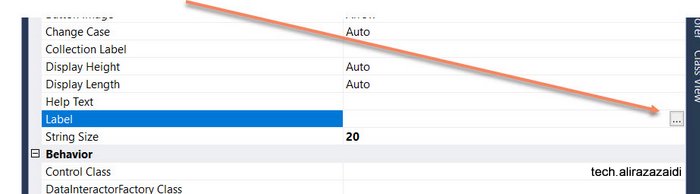
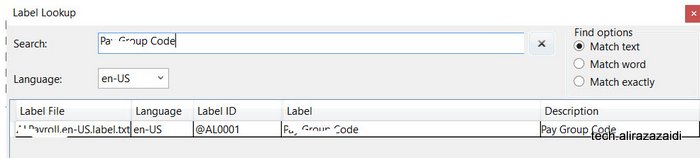
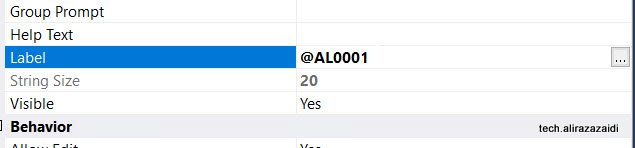
After creating labels file in project you find button in labels.


Search and selected required label

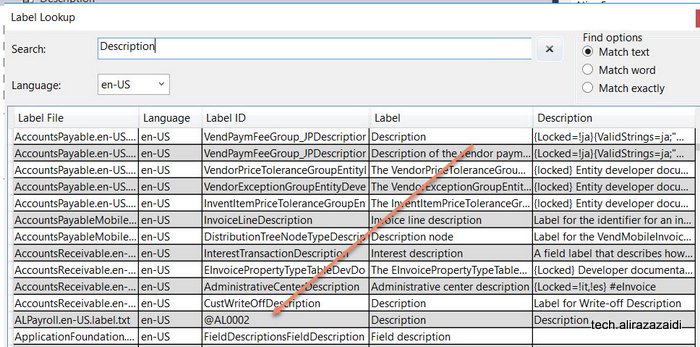
It is not recommend to create a new label for every field instead search and use label. For example for “Description” search and use existing one.


Something similar appear when I searched “Description”.

It shows all possible labels


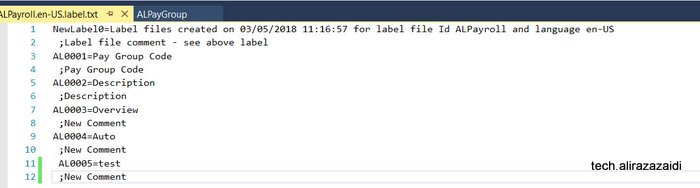
You can add labels in label file using text editor.  For example I write AL0005 in text editor.


On saving, On opening label editor I found something similar.


Customer / Vendor ledger Dimension D365 for finance and operations X++

February 28, 2018 by alirazazaidi


In D365 for finance things are little bit change and much more organized. In Dynamics Ax 2012, which consider as classic AX. We get ledger dimension  with DimensionStorage class


ledgerDim = DimensionStorage::getDynamicAccount(

‘US-001’,

LedgerJournalACType::Cust);//Account

offsetLedgerDim = DimensionStorage::getDynamicAccount(

‘USMF OPER’,

LedgerJournalACType::Bank);//OffsetAccount


In D365 this Microsoft provide LedgerDynamicAccountHelper. Code snippet is here


ledgerDim = LedgerDynamicAccountHelper:

:getDynamicAccountFromAccountNumber(‘US-1001’,

LedgerJournalACType::Cust);


offsetLedgerDim = LedgerDynamicAccountHelper:

:getDynamicAccountFromAccountNumber(

‘USMF OPER’,

LedgerJournalACType::Bank);


Reference http://daxingwitheshant.blogspot.com/2015/04/creating-payment-journal-using-x-in-ax.html

Parent child form Customization D365 for Finance and Operations

January 21, 2018 by alirazazaidi

Today I just noted down a very simple parent child form customization in D365 for Finance and operations.


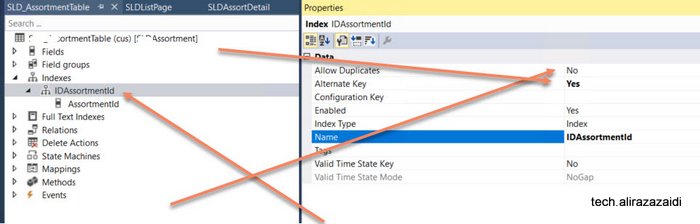
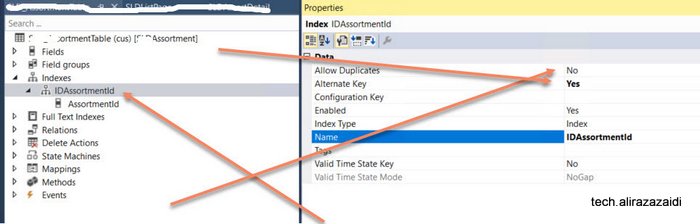
First step is to create a primary key or alternative key  For this create a Index

and set Alternative key true and Allow duplicate set to no.


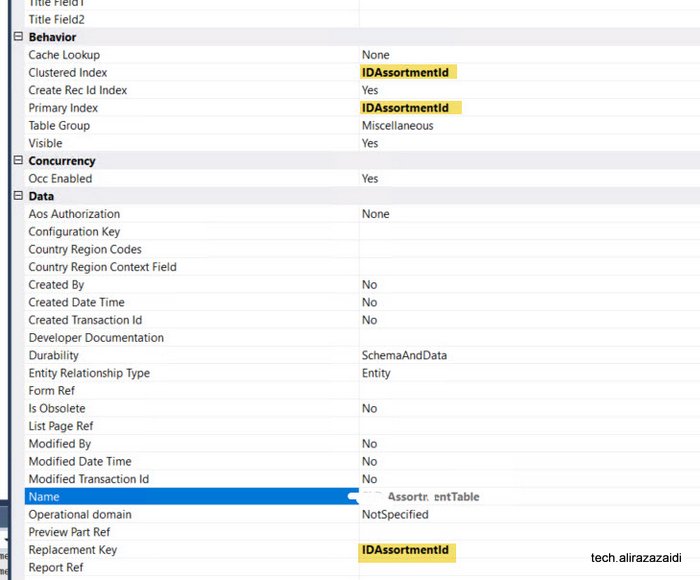
Next step expand the table Property and set following properties. With newly created Index.


As different to Dynamics Ax 2012. Reference field you have to manually created in child table.


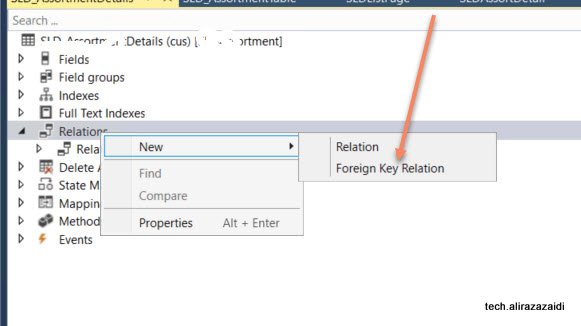
Now expand relationship node of child and right click and add relation


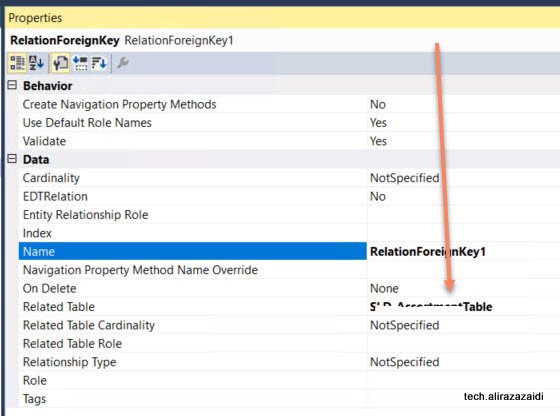
Relationship property window set table


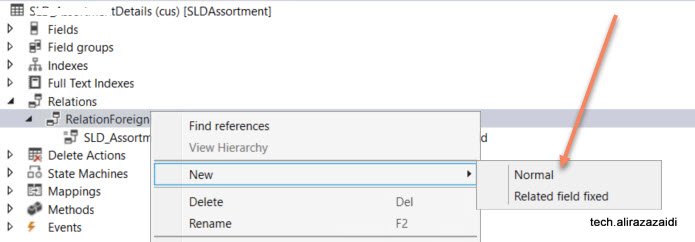
Now relight click on it and add normal relationship


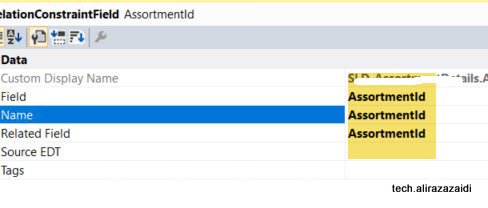
Set new  both side of required field.


Table relation is complete.


As I am fan of old style Dynamics Ax 2012 Style development So I made Customization similar to that.

There are multiple way to build parent child forms, with a new form Patterns of D365 for Finance and operations


For Detail page. Add new form in your project and did not select any form pattern.


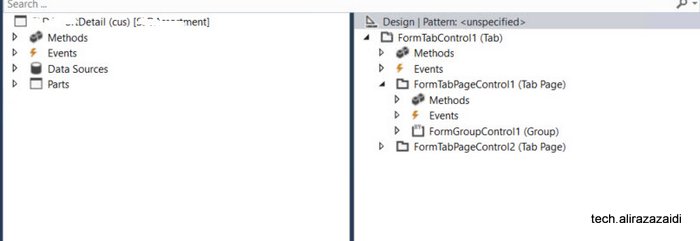
Then add Tab control and add two tab pages, one for Parent and one for child


Set tab control style property to FastTabs.


Now add both Tables in data source of form.


Set Join Source of child table set parent table


Now Drag required fields in group in parent area.


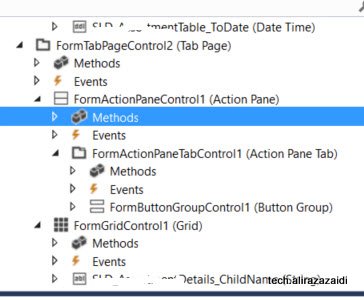
Now in child tab page, Add action pane, Action Tab control ,Button group and add three command buttons with Name add, edit and delete also set their command  type respectively.


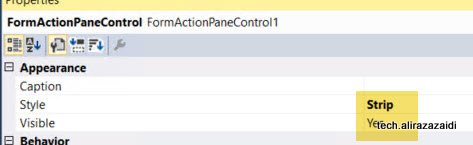
Also set action tab as Strip.


Also Set Button group data source property to child data source so Add, edit and Delete works on child table.


Now Add grid below action tab and Set its data source to child data source.


Also drag child table fields under the grid.


Tab page structure look like similar.


Now click on tab Design and  Set its data source to Parent Table, so out of the box button on form works for parent table.


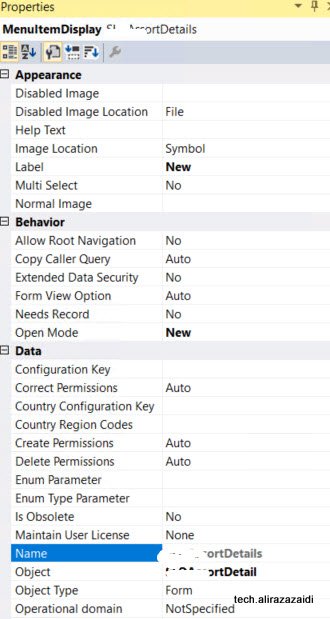
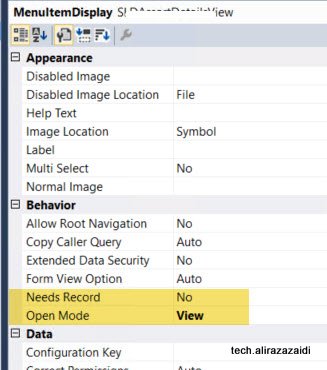
Now create three display menu and set one for Edit, one for View and Add new also set object property to detail form.


Like this. For new  set open mode to new and Set form in object


Similar edit menu, View menus the difference is open mode.


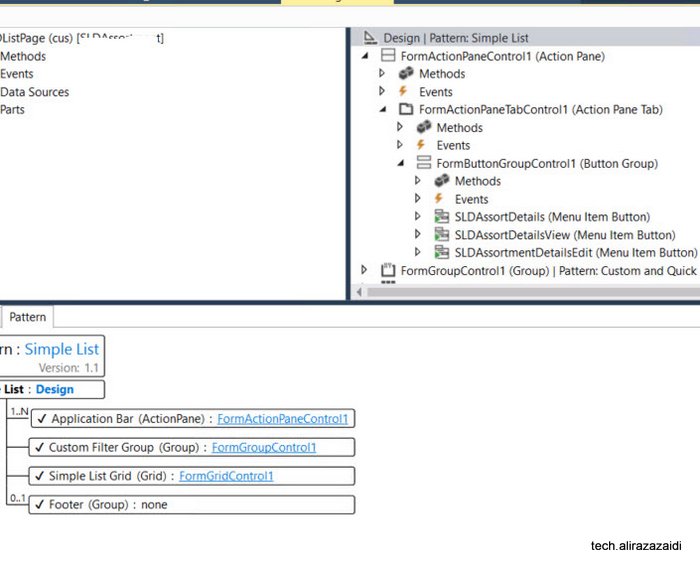
Now create a new form and a form and apply simple list pattern.

Also resolve pattern requirement, by adding Grid, Action Pane, and Group, Apply pattern on and then add Search

Like follow


Now drag three display menu drag them in Button group on List page’s action pane.


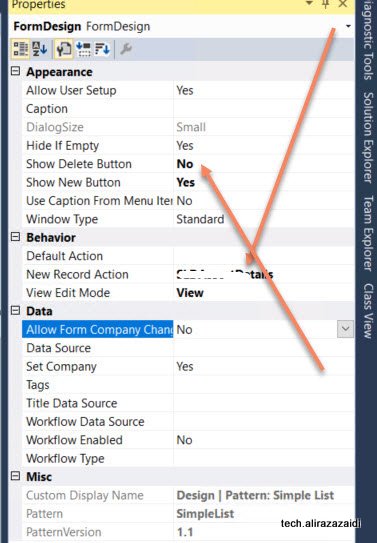
Right click Design and from properties  set New Record Action property to menu button of Action pane so on click on new button redirect to child page in new mode.


And set the


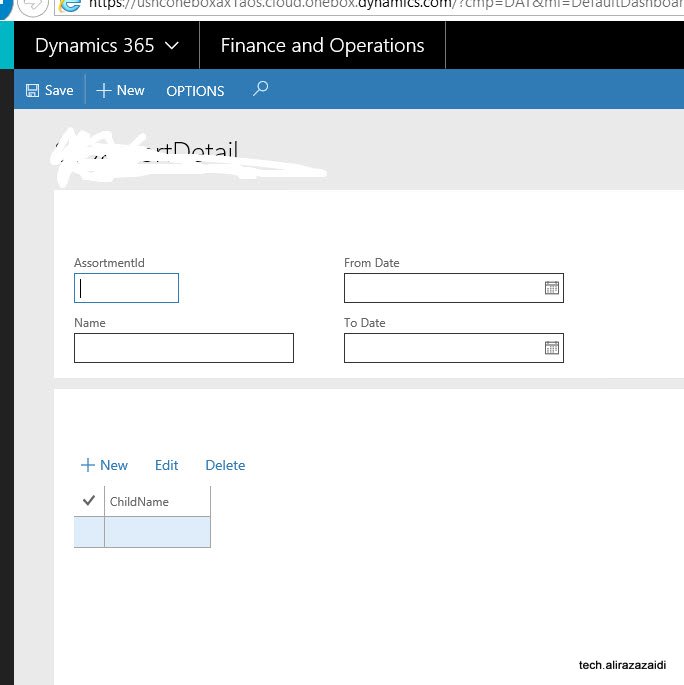
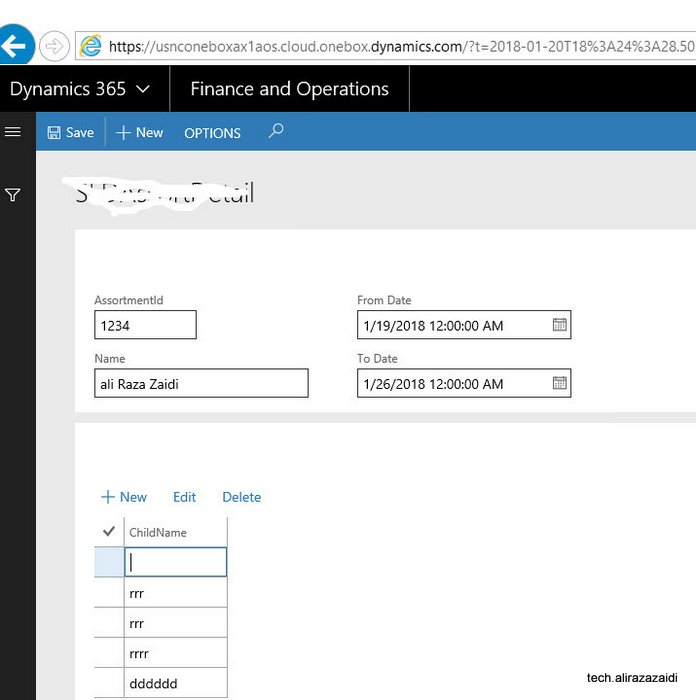
Let see the out put


If we click on new button, it will leads us to child page for create new, edit and delete records


On Clicking on link this will leads to detail page for selected record, which where we can add entries for child records.


Customization in Dynamics 365 for operation (Dynamics AX, AX 7) – Part 8 Tree Control

June 5, 2017 by alirazazaidi

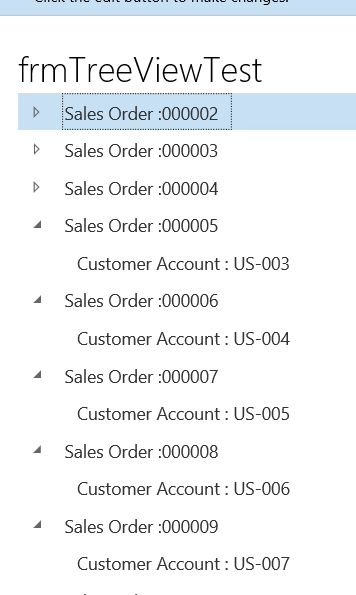
Recently I complete the custom Inquiry for Dynamics Ax 2012 R3. That customization is extensive and based on Tree control. Now I did experiment with Tree view control  in Dynamics 365 for operation and output will share here.  For this post I used Dynamics 365 for Operation Update 4 Vm with contoso data.

Suppose we need to build tree Where Sale order Number came as parent and Customer account is as its child node. There is thousand possibilities, but I use simplest way. So first step to add form. Then add tree control it. Set Form Name and Auto declaration property to true. So we can access control in code behind.


Next step is to insert following code snippet initial method.


public class frmTreeViewTest extends FormRun

{

/// <summary>

///

/// </summary>

public void init()

{

SalesTable _Table;

TreeItemIdx _TreeItemid;


super();


MyTreeView.deleteAll();

MyTreeView.lock();

while select * from _Table

{

// _TreeItemid = SysFormTreeControl::addTreeItem(MyTreeView, _Table.SalesId + " : " + _Table.CustAccount ,FormTreeAdd::Root,  _Table.RecId);


_TreeItemid = SysFormTreeControl::addTreeItem(MyTreeView, "Sales Order :" + _Table.SalesId ,FormTreeAdd::Root,  _Table.RecId);

SysFormTreeControl::addTreeItem(MyTreeView, " Customer Account : " + _Table.CustAccount ,_TreeItemid ,  _Table.RecId);


SysFormTreeControl::expandTree(MyTreeView,_TreeItemid);


}

}


}


Its works for me.


For rest Limit is only sky. Happy development.

Customization in New Dynamics Ax (Aka AX 7)- Part 6 Custom Workflow

October 19, 2016 by alirazazaidi

Customization in New Dynamics Ax (Aka AX 7)- Part 6 Custom Workflow


Hi, every one, Let’s explore the custom workflows in new Dynamics Ax commonly known as AX 7.

This blog post is part of series.

In this post, I build a custom workflow based on table and form build in pervious posts.

Below links leads you to older posts.


http://tech.alirazazaidi.com/customization-in-new-dynamics-ax-ax-7-part-1-creating-new-model/


http://tech.alirazazaidi.com/customization-in-new-dynamics-ax-aka-7-create-new-module/


http://tech.alirazazaidi.com/customization-in-new-dynamics-ax-ak-7-part-3-form-and-table-extensions/


http://tech.alirazazaidi.com/customization-in-new-dynamics-ax-ak-7-part-4-custom-tables/


http://tech.alirazazaidi.com/customization-in-new-dynamics-ax-aka-ax-7-part-5-custom-forms-simple-list-page/


As per Microsoft Documentation Custom workflow development is very similar to Dynamics Ax 2012.


Let’s do this in in following steps.

Custom Enum type.


We need Custom enum type for defining the States or status of Workflow. In Current Example I am using Al as naming convention for development.


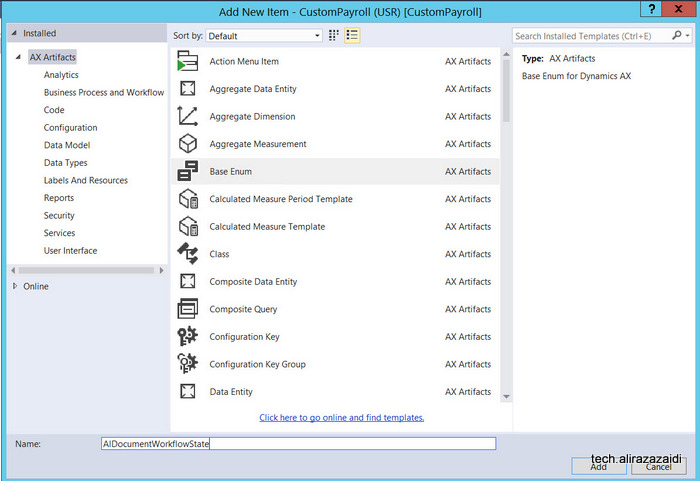
Right click on Solution explorer and then add a new from ax artifacts. Name it AlDocumentWorkflowState.

new-enumtype

When new AlDocumentWorkflowState enum is added in Solution explorer then double click on it to open it in designer mode. And then Add following Elements in it.

Add following elements in Enum

2016-09-20_22-56-56


Now drag this enum to required table and it will create a new field other wise you have to create a new field in table and set extended data type / base enum. For current example I used the AlEarningCodeGroup table which I created in my previous post.

workflowdrag


Table methods:

We need two methods in Table, first method is CanSubmitToWorkFlow.  This table help us to enable workflow based on specific condition, For example if table row has workflow state draft or not submitted, then workflow will processing will enable.

canworkflow


A new class is added in and update with logic, The condition on which Workflow enabled in class

public boolean canSubmitToWorkflow(str _workflowType = '')

{

boolean ret;

ret = super(_workflowType);

if (this.AlDocumentWorkflowState  == AlDocumentWorkflowState::NotSubmitted)

{

ret = boolean::true;

}

else

{

ret = boolean::false;

}

return ret;

}


Now add one more method in class We pass recId of current row and update its workflow state.

Public static void UpdateWorkFlow(RefRecId _RecId,AlDocumentWorkflowState _Status)

{

AlEarningCodeGroup _Group;

select forupdate * _Group where _Group.RecId == _RecId;

ttsbegin;

_Group.AlDocumentWorkflowState = _Status;

_Group.update();

ttscommit;


}


Custom Query:

Workflow uses the query to define the tables and fields that will be used by the workflow to define the data set available.

Again right click on solution explorer and add new Item and then select Query.

Now create a Query so we can build Document on that Query.

newquery


Name it AlEarningCodeGroupQuery .

Double click on Query and open it into Design mode and drag table in Data source. Save

querydetail

Now right click on Table and press Now F4 or open property window and set dynamics Field

fields

You find fields details.

query-building


Workflow Category:

A workflow category is used to determine the module in which the workflow will be available

Right click on project in solution explorer and add new Item.  From dialog window select workflow category.

workflowcategorydailog


Double click on workflow category created in previous step and open in designer view, press F4   to property window. set Module Property to HumanResource and Label to “AlEarningcodeGroupWFCategory” and save it.

categoryproperty


Workflow type.

Now to go to Solution explorer and add new item and from new Item dialog select

earncodetypewf


Name it AlEarningGrpWFType. A wizard will start and there you have to select Query , Workflow category and the link from which required form will be open. We build all these three things in previous steps.

ddde

When Wizard finish, number of classes, Workflow type and classes will be generated and added in Visual studio, you can find them in solution explorer.

menuee


Update label of workflow type open them in designer window and set its label.

earning-code-type

Similarly update labels of menu items to something good.

cancel


Similarly update the label of submit button.


Now expand the Submit Manager Class “AlEarnGrpWFTypeSubmitManager”  and update event handlers as follow.
/// <summary>

/// The AlEarnGrpWFTypeSubmitManager menu item action event handler.

/// </summary>

public class AlEarnGrpWFTypeSubmitManager

{

public static void main(Args _args)

{

AlEarningCodeGroup                           EarningCodeGroup;

AlEarnGrpWFTypeSubmitManager     submitManger;

recId _recId =                      _args.record().RecId;

WorkflowCorrelationId               _workflowCorrelationId;


workflowTypeName                    _workflowTypeName = workFlowTypeStr(“AlEarnGrpWFType”);

WorkflowComment                     note = “”;

WorkflowSubmitDialog                workflowSubmitDialog;

submitManger =                      new AlEarnGrpWFTypeSubmitManager();


//Opens the submit to workflow dialog.

workflowSubmitDialog = WorkflowSubmitDialog::construct(_args.caller().getActiveWorkflowConfiguration());

workflowSubmitDialog.run();


if (workflowSubmitDialog.parmIsClosedOK())

{

EarningCodeGroup = _args.record();

// Get comments from the submit to workflow dialog.

note = workflowSubmitDialog.parmWorkflowComment();


try

{

ttsbegin;

// Activate the workflow.
_workflowCorrelationId = Workflow::activateFromWorkflowType(_workflowTypeName, EarningCodeGroup.RecId, note, NoYes::No);


EarningCodeGroup.AlDocumentWorkflowState = AlDocumentWorkflowState::Submitted;

EarningCodeGroup.update();

ttscommit;


// Send an Infolog message.

info(“Submitted to workflow.”);

}

catch (Exception::Error)

{

error(“Error on workflow activation.”);

}

}


_args.caller().updateWorkFlowControls();

}


}


Now double click on event class “AlEarnGrpWFTypeEventHandler”  in solution explorer edit its events with table method call, We create this static method in one of above step.

/// <summary>

/// The AlEarnGrpWFTypeEventHandler workflow event handler.

/// </summary>

public class  AlEarnGrpWFTypeEventHandler implements WorkflowCanceledEventHandler,

WorkflowCompletedEventHandler,

WorkflowStartedEventHandler

{

public void started(WorkflowEventArgs _workflowEventArgs)

{

AlEarningCodeGroup::UpdateWorkFlow(_workflowEventArgs.parmWorkflowContext().parmRecId(),AlDocumentWorkflowState::Submitted);

}


public void canceled(WorkflowEventArgs _workflowEventArgs)

{

AlEarningCodeGroup::UpdateWorkFlow(_workflowEventArgs.parmWorkflowContext().parmRecId(),AlDocumentWorkflowState::PendingConcellation);

}


public void completed(WorkflowEventArgs _workflowEventArgs)

{

AlEarningCodeGroup::UpdateWorkFlow(_workflowEventArgs.parmWorkflowContext().parmRecId(),AlDocumentWorkflowState::Completed);

}


}


Workflow Approval:


Add new item and select Workflow Approval like in previous steps

approval


In wizard select Workflow document this will be generated by Workflow element step. Also select the field group from table on which we are building workflow. Also select form menu item which will open when user click on notification.


earaninggroupcodeapprovalwizard


earninggroupapprovalwizarddetails


In Solution explorer new menu items and classes are added.

new-items


Now double click and open the approval class and update it as AlEarningGroupWFApprEventHandler

And update workflow dates

/// <summary>

/// The AlEarningGroupWFApprEventHandler workflow outcome event handler.

/// </summary>

public final class AlEarningGroupWFApprEventHandler implements WorkflowElementCanceledEventHandler,

WorkflowElemChangeRequestedEventHandler,

WorkflowElementCompletedEventHandler,

WorkflowElementReturnedEventHandler,

WorkflowElementStartedEventHandler,

WorkflowElementDeniedEventHandler,

WorkflowWorkItemsCreatedEventHandler

{

public void started(WorkflowElementEventArgs _workflowElementEventArgs)

{


}


public void canceled(WorkflowElementEventArgs _workflowElementEventArgs)

{

AlEarningCodeGroup::UpdateWorkFlow(_workflowElementEventArgs.parmWorkflowContext().parmRecId(), AlDocumentWorkflowState::PendingConcellation);

}


public void completed(WorkflowElementEventArgs _workflowElementEventArgs)

{

AlEarningCodeGroup::UpdateWorkFlow(_workflowElementEventArgs.parmWorkflowContext().parmRecId(), AlDocumentWorkflowState::Approved);

}


public void denied(WorkflowElementEventArgs _workflowElementEventArgs)

{

AlEarningCodeGroup::UpdateWorkFlow(_workflowElementEventArgs.parmWorkflowContext().parmRecId(), AlDocumentWorkflowState::Reject);

}


public void changeRequested(WorkflowElementEventArgs _workflowElementEventArgs)

{

AlEarningCodeGroup::UpdateWorkFlow(_workflowElementEventArgs.parmWorkflowContext().parmRecId(), AlDocumentWorkflowState::ChangeRequest);

}


public void returned(WorkflowElementEventArgs _workflowElementEventArgs)

{

AlEarningCodeGroup::UpdateWorkFlow(_workflowElementEventArgs.parmWorkflowContext().parmRecId(), AlDocumentWorkflowState::Returned);

}


public void created(WorkflowWorkItemsEventArgs _workflowWorkItemsEventArgs)

{

// TODO:  Write code to execute once work items are created.

}


}


Now double click on workflow type and open in designer

workflow-type


workflowapproval


Update it workflow approval with name

approva

Form Properties to enable Workflow.
 

Now expand the form, double click on designer and set following properties.
 

Workflow data source, enable for workflow and workflow Type.

worktypedetial

Now save Compile And Run with Ctrl F5 to run without debugging to open Dynamics Ax web client

workflow-setup


Now we have to configure workflow.

We set workflow category is Human Resource Management, and you will find Human resource workflows

setupworkflow


Create a new workflow and select the workflow type we created in above step.

login


Enter credentials.


From designer window select and configure workflow.

setup


Save and activate.


Now when you open the client in browser. You will find workflow menu item you can run the workflow from here.


workflow-setss


Customization in New Dynamics Ax (Aka AX 7) Part 5 – Custom forms – Simple List Page.

September 13, 2016 by alirazazaidi


This post is series. In Last post we create some custom tables for  in Dynamics Ax.

Customization in New Dynamics AX (AK 7) Part 4- Custom Tables

In basic level we create two tables EarningCodeGroup and Earning Code. In this post we build simplest and very basic level forms.


Open the project and add a new Item and select Form  from “Add New Item “ Dialog and set its Name “AlEarningCodeGroup”

2016-09-13_22-36-57


New form will be created in solution explore. Double click on it and open it in design mode.

FormDesign


Now right click on right side and select form Pattern.

Apply Pattern

From pattern select Simple list pattern.

You can read more details about simple list in the following

https://ax.help.dynamics.com/en/wiki/simple-list-form-pattern/


Patterns are applied but it described the following controls are missing.

Missing Controll


Now again right click on designer on and add action pane, custom filter group and grid.

Add new control


In first step I add the Action tab, then Add Action tab Pane page and then Button group and then add three command button.

ActionTab


Now update the different properties of Action Pane, tab strip and command button.

Change default to strip

Strip stryle

Set Caption as Home

Now select first command button set its text as New and command button as New.

Command Button Properties

Similarly set other two command button as Edit, and delete.

Now again right click on design and also add  group and rename it to grpFilter

Also right click on custom filter group and apply pattern We will see this in next post.

ButtonFitler


Now add Grid so form pattern requirement will be complete. Rename It to grpEarningCodeGroup. After that form design look like

Validated FormPattern


Now we go back to add table as a data source. We created the AxEarningCodeGroup in previous post, we will use that table here.

Grid data source


Set Name it with your table name, select table and set insertIfEmpty property to no.

DataSourceProperty

Now go back and expand action pane => Pane and then button group  and update datasouce property to table  property to  AlEarningCodeGroup

Button Group DataSource property


Now right click on grid and press F4 or open property window and set datasource to AxEarnigCodeGroup and datagroup to grid (I created the field group with Name “Grid” In previous post”.

Grid dDaou


If you see, you find two fields are added under grid node


Grid fields


Now go back to solution explorer and create a new menu Item of type display

DisplayMenu

Name It as “AlEarningCodeGroupMenu” . New menu Item will be added on solution explorer. Double click on it to open it in design mode and Set Object Type to form and Object to AlFormEarningCodeGroup. Also Update its label Property to “Earning code Group”.

DisplayMenuProperty


Open the AlEarningCodeGroup table in designer window and set its form ref to AlFormEarningCodeGroupMenu This will help us to add earning code group in earning code entry form.

Table Propeperties


Now we add the menu Item in  Menu to run and display,  For this open the menu Item in designer mode and drag menu item created in above step. In this post I am using custom Menu, If you are working with out of box menu then you must create menu extension then drag the menu Item in it.

Menu Display


Now run the application with Ctrl F5, I found the earning Code group in menu.

Live menu


By Clicking on link, forms open and I did following entries.


Data Entry


« Previous Page
Next Page »

Primary Sidebar

About

I am Dynamics AX/365 Finance and Operations consultant with years of implementation experience. I has helped several businesses implement and succeed with Dynamics AX/365 Finance and Operations. The goal of this website is to share insights, tips, and tricks to help end users and IT professionals.

Legal

Content published on this website are opinions, insights, tips, and tricks we have gained from years of Dynamics consulting and may not represent the opinions or views of any current or past employer. Any changes to an ERP system should be thoroughly tested before implementation.

Categories

  • Accounts Payable (2)
  • Advance Warehouse (2)
  • AI (3)
  • Asset Management (3)
  • Azure Functions (1)
  • Books (6)
  • Certification Guide (3)
  • ChatGPT (3)
  • Claude (1)
  • Customization Tips for D365 for Finance and Operations (64)
  • D365OF (60)
  • Data Management (1)
  • database restore (1)
  • Dynamics 365 (59)
  • Dynamics 365 for finance and operations (139)
  • Dynamics 365 for Operations (175)
  • Dynamics AX (AX 7) (134)
  • Dynamics AX 2012 (274)
  • Dynamics Ax 2012 Forms (13)
  • Dynamics Ax 2012 functional side (16)
  • Dynamics Ax 2012 Reporting SSRS Reports. (31)
  • Dynamics Ax 2012 Technical Side (52)
  • Dynamics Ax 7 (65)
  • Exam MB-330: Microsoft Dynamics 365 Supply Chain Management (7)
  • Excel Addin (1)
  • Favorites (12)
  • Financial Modules (6)
  • Functional (8)
  • General Journal (1)
  • Implementations (1)
  • Ledger (1)
  • Lifecycle Services (1)
  • Logseq (4)
  • Management Reporter (1)
  • Microsoft Excel (4)
  • MS Dynamics Ax 7 (64)
  • MVP summit (1)
  • MVP summit 2016 (1)
  • New Dynamics Ax (19)
  • Non Defined (9)
  • Note taking Apps (2)
  • Obsidian (4)
  • Personal Knowledge Management (3)
  • PKM (16)
  • Power Platform (6)
  • Procurement (5)
  • procurement and sourcing (6)
  • Product Information Management (4)
  • Product Management (6)
  • Production Control D365 for Finance and Operations (10)
  • Sale Order Process (10)
  • Sale Order Processing (10)
  • Sales and Distribution (5)
  • Soft Skill (1)
  • Supply Chain Management D365 F&O (5)
  • Tips and tricks (278)
  • Uncategorized (165)
  • Upgrade (1)
  • Web Cast (7)
  • White papers (4)
  • X++ (10)

Wiki

  • SCM

Copyright © 2026 · Magazine Pro On Genesis Framework · WordPress · Log in