I found very interesting and interactive guided tour provided by Microsoft at Dynamics.com. I feel its worth to share.
Enjoy and say welcome to 365 degree change in the world of ERP.
A practitioner’s musings on Dynamics 365 Finance and Operations
I found very interesting and interactive guided tour provided by Microsoft at Dynamics.com. I feel its worth to share.
Enjoy and say welcome to 365 degree change in the world of ERP.
I was developing the report by adding UI Class and building the drop down list to select multiple customer.
When I try to bind, DataSet of SSRS report to data provider class, it shows following error.
RegisterOverrideMethod was called twice for the same object for method ‘textChange’. You can only override a method once per instance.

On Exploring I found that I used the Same dialog field in two lookup methods.
SysLookupMultiSelectCtrl::constructWithQuery(this.dialog().dialogForm().formRun(), dlgCustAccount.control(), query, false, selectedFields);
Today is another small tip,
I was developing a custom report. Queried table stored the date and time in separate fields ie. Transdate and transtime. On mapping the transtime to report, its showed time format. Instead of time value.

For it solution, I added the string field on report temp table and then convert the time with time2str function and map to the field.
Complete statement is below.
TableTmp.StransTime = time2Str(_Trans.transTime, TimeSeparator::Colon, TimeFormat::AMPM);
As result, report will display the trans time instead of its format.

Customization in New Dynamics Ax (Aka AX 7)- Part 6 Custom Workflow
Hi, every one, Let’s explore the custom workflows in new Dynamics Ax commonly known as AX 7.
This blog post is part of series.
In this post, I build a custom workflow based on table and form build in pervious posts.
Below links leads you to older posts.
http://tech.alirazazaidi.com/customization-in-new-dynamics-ax-ax-7-part-1-creating-new-model/
http://tech.alirazazaidi.com/customization-in-new-dynamics-ax-aka-7-create-new-module/
http://tech.alirazazaidi.com/customization-in-new-dynamics-ax-ak-7-part-3-form-and-table-extensions/
http://tech.alirazazaidi.com/customization-in-new-dynamics-ax-ak-7-part-4-custom-tables/
As per Microsoft Documentation Custom workflow development is very similar to Dynamics Ax 2012.
Let’s do this in in following steps.
Custom Enum type.
We need Custom enum type for defining the States or status of Workflow. In Current Example I am using Al as naming convention for development.
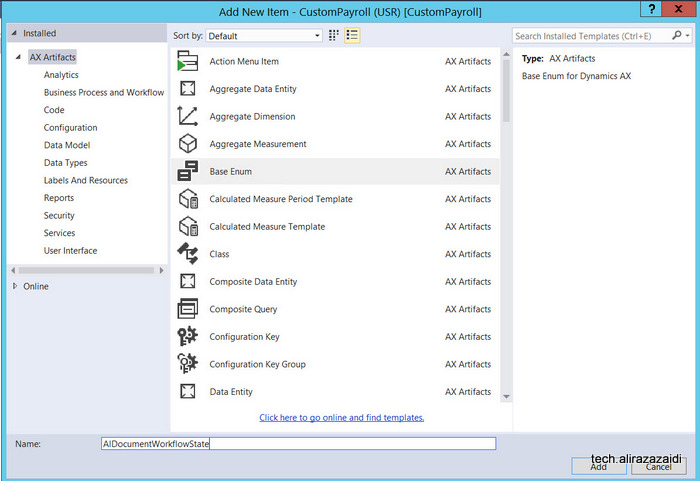
Right click on Solution explorer and then add a new from ax artifacts. Name it AlDocumentWorkflowState.

When new AlDocumentWorkflowState enum is added in Solution explorer then double click on it to open it in designer mode. And then Add following Elements in it.
Add following elements in Enum

Now drag this enum to required table and it will create a new field other wise you have to create a new field in table and set extended data type / base enum. For current example I used the AlEarningCodeGroup table which I created in my previous post.

Table methods:
We need two methods in Table, first method is CanSubmitToWorkFlow. This table help us to enable workflow based on specific condition, For example if table row has workflow state draft or not submitted, then workflow will processing will enable.

A new class is added in and update with logic, The condition on which Workflow enabled in class
public boolean canSubmitToWorkflow(str _workflowType = '')

{

boolean ret;

ret = super(_workflowType);

if (this.AlDocumentWorkflowState  == AlDocumentWorkflowState::NotSubmitted)

{

ret = boolean::true;

}

else

{

ret = boolean::false;

}

return ret;

}
Now add one more method in class We pass recId of current row and update its workflow state.
Public static void UpdateWorkFlow(RefRecId _RecId,AlDocumentWorkflowState _Status)
{
AlEarningCodeGroup _Group;
select forupdate * _Group where _Group.RecId == _RecId;
ttsbegin;
_Group.AlDocumentWorkflowState = _Status;
_Group.update();
ttscommit;
}
Custom Query:
Workflow uses the query to define the tables and fields that will be used by the workflow to define the data set available.
Again right click on solution explorer and add new Item and then select Query.
Now create a Query so we can build Document on that Query.

Name it AlEarningCodeGroupQuery .
Double click on Query and open it into Design mode and drag table in Data source. Save

Now right click on Table and press Now F4 or open property window and set dynamics Field

You find fields details.

Workflow Category:
A workflow category is used to determine the module in which the workflow will be available
Right click on project in solution explorer and add new Item. From dialog window select workflow category.

Double click on workflow category created in previous step and open in designer view, press F4 to property window. set Module Property to HumanResource and Label to “AlEarningcodeGroupWFCategory” and save it.

Workflow type.
Now to go to Solution explorer and add new item and from new Item dialog select

Name it AlEarningGrpWFType. A wizard will start and there you have to select Query , Workflow category and the link from which required form will be open. We build all these three things in previous steps.

When Wizard finish, number of classes, Workflow type and classes will be generated and added in Visual studio, you can find them in solution explorer.

Update label of workflow type open them in designer window and set its label.

Similarly update labels of menu items to something good.

Similarly update the label of submit button.
Now expand the Submit Manager Class “AlEarnGrpWFTypeSubmitManager” and update event handlers as follow.
/// <summary>
/// The AlEarnGrpWFTypeSubmitManager menu item action event handler.
/// </summary>
public class AlEarnGrpWFTypeSubmitManager
{
public static void main(Args _args)
{
AlEarningCodeGroup EarningCodeGroup;
AlEarnGrpWFTypeSubmitManager submitManger;
recId _recId = _args.record().RecId;
WorkflowCorrelationId _workflowCorrelationId;
workflowTypeName _workflowTypeName = workFlowTypeStr(“AlEarnGrpWFType”);
WorkflowComment note = “”;
WorkflowSubmitDialog workflowSubmitDialog;
submitManger = new AlEarnGrpWFTypeSubmitManager();
//Opens the submit to workflow dialog.
workflowSubmitDialog = WorkflowSubmitDialog::construct(_args.caller().getActiveWorkflowConfiguration());
workflowSubmitDialog.run();
if (workflowSubmitDialog.parmIsClosedOK())
{
EarningCodeGroup = _args.record();
// Get comments from the submit to workflow dialog.
note = workflowSubmitDialog.parmWorkflowComment();
try
{
ttsbegin;
// Activate the workflow.
_workflowCorrelationId = Workflow::activateFromWorkflowType(_workflowTypeName, EarningCodeGroup.RecId, note, NoYes::No);
EarningCodeGroup.AlDocumentWorkflowState = AlDocumentWorkflowState::Submitted;
EarningCodeGroup.update();
ttscommit;
// Send an Infolog message.
info(“Submitted to workflow.”);
}
catch (Exception::Error)
{
error(“Error on workflow activation.”);
}
}
_args.caller().updateWorkFlowControls();
}
}
Now double click on event class “AlEarnGrpWFTypeEventHandler” in solution explorer edit its events with table method call, We create this static method in one of above step.
/// <summary>
/// The AlEarnGrpWFTypeEventHandler workflow event handler.
/// </summary>
public class AlEarnGrpWFTypeEventHandler implements WorkflowCanceledEventHandler,
WorkflowCompletedEventHandler,
WorkflowStartedEventHandler
{
public void started(WorkflowEventArgs _workflowEventArgs)
{
AlEarningCodeGroup::UpdateWorkFlow(_workflowEventArgs.parmWorkflowContext().parmRecId(),AlDocumentWorkflowState::Submitted);
}
public void canceled(WorkflowEventArgs _workflowEventArgs)
{
AlEarningCodeGroup::UpdateWorkFlow(_workflowEventArgs.parmWorkflowContext().parmRecId(),AlDocumentWorkflowState::PendingConcellation);
}
public void completed(WorkflowEventArgs _workflowEventArgs)
{
AlEarningCodeGroup::UpdateWorkFlow(_workflowEventArgs.parmWorkflowContext().parmRecId(),AlDocumentWorkflowState::Completed);
}
}
Workflow Approval:
Add new item and select Workflow Approval like in previous steps

In wizard select Workflow document this will be generated by Workflow element step. Also select the field group from table on which we are building workflow. Also select form menu item which will open when user click on notification.


In Solution explorer new menu items and classes are added.

Now double click and open the approval class and update it as AlEarningGroupWFApprEventHandler
And update workflow dates
/// <summary>
/// The AlEarningGroupWFApprEventHandler workflow outcome event handler.
/// </summary>
public final class AlEarningGroupWFApprEventHandler implements WorkflowElementCanceledEventHandler,
WorkflowElemChangeRequestedEventHandler,
WorkflowElementCompletedEventHandler,
WorkflowElementReturnedEventHandler,
WorkflowElementStartedEventHandler,
WorkflowElementDeniedEventHandler,
WorkflowWorkItemsCreatedEventHandler
{
public void started(WorkflowElementEventArgs _workflowElementEventArgs)
{
}
public void canceled(WorkflowElementEventArgs _workflowElementEventArgs)
{
AlEarningCodeGroup::UpdateWorkFlow(_workflowElementEventArgs.parmWorkflowContext().parmRecId(), AlDocumentWorkflowState::PendingConcellation);
}
public void completed(WorkflowElementEventArgs _workflowElementEventArgs)
{
AlEarningCodeGroup::UpdateWorkFlow(_workflowElementEventArgs.parmWorkflowContext().parmRecId(), AlDocumentWorkflowState::Approved);
}
public void denied(WorkflowElementEventArgs _workflowElementEventArgs)
{
AlEarningCodeGroup::UpdateWorkFlow(_workflowElementEventArgs.parmWorkflowContext().parmRecId(), AlDocumentWorkflowState::Reject);
}
public void changeRequested(WorkflowElementEventArgs _workflowElementEventArgs)
{
AlEarningCodeGroup::UpdateWorkFlow(_workflowElementEventArgs.parmWorkflowContext().parmRecId(), AlDocumentWorkflowState::ChangeRequest);
}
public void returned(WorkflowElementEventArgs _workflowElementEventArgs)
{
AlEarningCodeGroup::UpdateWorkFlow(_workflowElementEventArgs.parmWorkflowContext().parmRecId(), AlDocumentWorkflowState::Returned);
}
public void created(WorkflowWorkItemsEventArgs _workflowWorkItemsEventArgs)
{
// TODO: Write code to execute once work items are created.
}
}
Now double click on workflow type and open in designer


Update it workflow approval with name

Form Properties to enable Workflow.
Now expand the form, double click on designer and set following properties.
Workflow data source, enable for workflow and workflow Type.

Now save Compile And Run with Ctrl F5 to run without debugging to open Dynamics Ax web client

Now we have to configure workflow.
We set workflow category is Human Resource Management, and you will find Human resource workflows

Create a new workflow and select the workflow type we created in above step.

Enter credentials.
From designer window select and configure workflow.

Save and activate.
Now when you open the client in browser. You will find workflow menu item you can run the workflow from here.

While building Dynamics Ax 7 simple list page, I got following error on compiling.
Severity Code Description Project File Line
Error Path: [AxForm/AXEarningCodeGroup/Design/Controls/Filtergrp]:Control ‘AxForm/AXEarningCodeGroup/Design/Controls/Filtergrp’ is missing child ‘Quick Filter’ required by pattern ‘Custom and Quick Filters’. CustomPayroll (USR) [CustomPayroll] C:\AOSService\PackagesLocalDirectory\ApplicationSuite\CustomPayroll1\AxForm\AXEarningCodeGroup.xml 0
In short
Design/Controls/Filtergrp’ is missing child ‘Quick Filter
Something different then Dynamics Ax 2012. Yes, just right click on add a group and the add Quick Filter.


No other property I found, After solution compiled without any error.
Just open then dynamics learning portal, two new menus or classification found on top menu.
Dynamics 365 enterprise and Dynamics 365 Business.

I found that Microsoft just upload 6 new courses for Dynamics Enterprise on Dynamics Learning Portal.
If you have time and passion and more importantly Dynamics Learning Portal access credentials, you must enjoy the 365 degree change in World of ERP.

List of courses are as below.
80731AE: Architecture of Microsoft Dynamics 365 for Operations
80777AE: Monitoring and Diagnostic Tools in Microsoft Dynamics 365 for Operations
80794AE: Deploying and Servicing Environments in Microsoft Dynamics 365 for Operations by using LCS
80773AE: System Administration in Microsoft Dynamics 365 for Operations
80774AE: Managing Users and Security in Microsoft Dynamics 365 for Operations
80795AE: Managing Users and Security in Microsoft Dynamics 365 for Operations
I created a video and posted on Channel 9 . It is my native language. There is sound quality problem, But I made it. This is my second video on Channel 9.
We conduct an information sharing session on New Dynamics Ax 7 at Microsoft Innovation Center Lahore on 7 October 2016.
In this session, two speakers invited by Meetup group. Hasan Bukhari from Maison Consultancy (It is leading Microsoft Dynamics AX Implementer in Pakistan and Middle east). Second speaker was Me.
As professionally I am technical consultant (Currently working as freelancer). I cover the technical side of Dynamics Ax. While Mr. Hasan Bukhari covered the Functional expects of The Product. Usman Ur Rehman Ahmed helped us to organize this meetup. Here are some picture taken during the session.


For Future reference, I used following Queries to check the General Ledger Entry in Dynamics ax 2012. Small tip,
You can used them to delete posted ledger entry
select * from LEDGERJOURNALTABLE where JOURNALNUM =’XYZ-015528′
select * from LEDGERJOURNALTRANS where JOURNALNUM =’XyZ-015528′
select * from LedgerEntryJournal where JOURNALNUMBER =’XyZ-015528′
select recid,* from GeneralJournalEntry where LedgerEntryJournal= LedgerEntryJournal.RecID
select * from GeneralJournalAccountEntry where GeneralJournalEntry = GeneralJournalEntry.RecID
select * from custtrans where custtrans.VOUCHER in–ACCOUNTNUM =’Cust-02032′ and(select LedgerJournalTrans.VOUCHER from LedgerJournalTransjoin LEDGERJOURNALTABLEon LedgerJournalTrans.JOURNALNUM = LEDGERJOURNALTABLE.JOURNALNUM
where LEDGERJOURNALTABLE.POSTED =1 and ( LedgerJournalTrans.ACCOUNTTYPE =1 or LedgerJournalTrans.OFFSETACCOUNTTYPE =1) and LEDGERJOURNALTABLE.JOURNALNUM =’XyZ-015528′
This post is series. In Last post we create some custom tables for in Dynamics Ax.
Customization in New Dynamics AX (AK 7) Part 4- Custom Tables
In basic level we create two tables EarningCodeGroup and Earning Code. In this post we build simplest and very basic level forms.
Open the project and add a new Item and select Form from “Add New Item “ Dialog and set its Name “AlEarningCodeGroup”

New form will be created in solution explore. Double click on it and open it in design mode.

Now right click on right side and select form Pattern.

From pattern select Simple list pattern.
You can read more details about simple list in the following
https://ax.help.dynamics.com/en/wiki/simple-list-form-pattern/
Patterns are applied but it described the following controls are missing.

Now again right click on designer on and add action pane, custom filter group and grid.

In first step I add the Action tab, then Add Action tab Pane page and then Button group and then add three command button.

Now update the different properties of Action Pane, tab strip and command button.
Change default to strip

Set Caption as Home
Now select first command button set its text as New and command button as New.

Similarly set other two command button as Edit, and delete.
Now again right click on design and also add group and rename it to grpFilter
Also right click on custom filter group and apply pattern We will see this in next post.

Now add Grid so form pattern requirement will be complete. Rename It to grpEarningCodeGroup. After that form design look like

Now we go back to add table as a data source. We created the AxEarningCodeGroup in previous post, we will use that table here.

Set Name it with your table name, select table and set insertIfEmpty property to no.

Now go back and expand action pane => Pane and then button group and update datasouce property to table property to AlEarningCodeGroup

Now right click on grid and press F4 or open property window and set datasource to AxEarnigCodeGroup and datagroup to grid (I created the field group with Name “Grid” In previous post”.

If you see, you find two fields are added under grid node

Now go back to solution explorer and create a new menu Item of type display

Name It as “AlEarningCodeGroupMenu” . New menu Item will be added on solution explorer. Double click on it to open it in design mode and Set Object Type to form and Object to AlFormEarningCodeGroup. Also Update its label Property to “Earning code Group”.

Open the AlEarningCodeGroup table in designer window and set its form ref to AlFormEarningCodeGroupMenu This will help us to add earning code group in earning code entry form.

Now we add the menu Item in Menu to run and display, For this open the menu Item in designer mode and drag menu item created in above step. In this post I am using custom Menu, If you are working with out of box menu then you must create menu extension then drag the menu Item in it.

Now run the application with Ctrl F5, I found the earning Code group in menu.

By Clicking on link, forms open and I did following entries.