• Skip to main content
  • Skip to primary sidebar
  • Home
  • About
  • Recommended Readings
    • 2022 Book Reading
    • 2023 Recommended Readings
    • Book Reading 2024
    • Book Reading 2025
  • Supply Chain Management Guide
  • PKM
  • Microsoft Excel
  • Microsoft Copilot in Office 365
  • Public Wiki Page

Ali Raza Zaidi

A practitioner’s musings on Dynamics 365 Finance and Operations

Dynamics Ax

Custom Financial Dimension in Dynamics 365 for Finance and Operations (AX 7)

July 14, 2017 by alirazazaidi

Purpose of this post to share the procedure I learned yesterday for adding custom Financial dimension in Dynamics 365 for Finance and Operations aka (AX 7). So I added a fictional Financial dimension.

Suppose we have to create a financial dimension with “Jaggah Tax”. This financial dimension required in Sales order, Sales Line, Purchase Order, Purchase line.


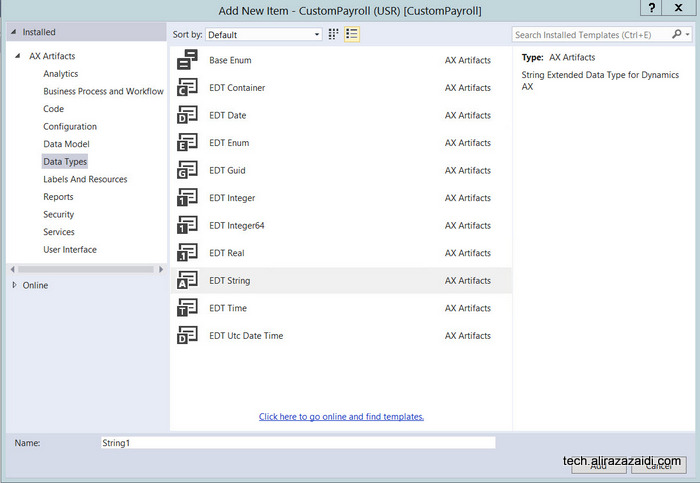
New Custom financial can be added and activate by following steps.


First of all open Ax in browser and change its legal entity to USMF.

Now click on General Ledger ==> Charts of Accounts ==> Dimensions => Financial Dimensions.


From financial dimensions page Click on New button. As a result detail page open in new / create mode.


You will find here three editable controls. From Used value drop down, select custom dimension, in second text box type name of dimension and in third text box type Report column Name.


Now click on Activate button from top menu.


On pressing Activating menu button, on right hand side a popup dialog opens. You can select different options from here. I want to activate this financial dimension so I selected activate now option.


So progress dialog show activation is under progress.


Finally we created a new financial dimension.


Now next step is to add values for dimension. Suppose our organization pay two types of jaggah tax.

-Noori Naath

-Mola Jatt.


So for this click on Dimension values menu button after selecting dimension open in detail section.


Click on New and enter values as much as requires. With each value also add  activation date.


We successfully create custom financial dimension. But until we add financial dimension in accounting structure  it will not available for selection.


For this again open General Ledger => Setup => Ledger


From Ledger detail form, select Manufacturing P&L. either double click on it or after selection click on edit button.


Account Structure is open, Also click on add  segment.


On right side a pop up opens with all financial dimensions. You can select required dimension.

From right side a pop up opens from there you can select required Dimension.


After selection Accounting structure look a like below screenshot.


Now on update financial dimensions values below text boxes in grid to “”;*. By default it will be *. Which means value is required.  “”;*. Means empty value or null values also allow in dimension.

Now update top value and activate it.

Activation in progress.


Now open Purchase order and from Header view, select newly added financial dimension.


Values are available here.


Our newly add financial dimension successfully added


Data manipulation tip 4 Dynamics ax 2012 and D365 of Operations Insert_recordset

April 24, 2017 by alirazazaidi

During report development we populate temp table and bind it to SSRS report. And most of the time we were doing one to one mapping inside while loop or query run loop., Kindly consider following code snippet.

While select sum(Qty) from Inventtrans group by 
ItemId, InventDimId , DatePhysical
Where datePahyical > _fromdaet
&& datePhayical <_todate
{
Tmp.ItemId= inventrans.ItemId;
Tmp.IventDim = inventtrans.InventId;
Tmp.Qty = inventtrans.QTY;
Tmp.Insert();

}

But if we replace loop with Insert_RecordSet , report execution time reduce much. Consider following code snippet used to replace loop with Insert_Recordset

Insert_recordset Tmp (ItemId,InventdimId,QTY)
Select forceplaceholders ItemId, InventDimId, sum(QTY)
From inventtrans
Group by ItemId,InventDimId
Where datePahyical > _fromdaet
&& datePhayical <_todate;

Customization in New Dynamics AX (AK 7) Part 4- Custom Tables

August 24, 2016 by alirazazaidi

Suppose we are writing a custom module for Payroll. According to requirement, we have to create a custom table for Earning code. As well as Earning group.


At minimum we required following fields

Earn  Code Group Table

Earning Group of length 20.

Earning Group description length 60


Earning Code Table

Earning Code possible length 20.

Earning Code Description length 60.

Variable of fixed, If Variable the base value will be used as base percentage of Basic Salary, If fixed then base value will used as fixed amount.

Amount, The base value described as previous step.

And reference of Earning Code Group.


Lest explore some Extended data Type and enum and we create them with.


Extended Data Type:

For Extended Data Type is some kind of reusable data type based in primitive data type with some extra properties.

For example In Dynamics AX there is out of box extended Data type with “AmountCur”. It is Real based data Type. This extended Data Type usually used in amount related fields. So one of the many benefit of Extended data type is that we can change one place and it reflect where ever it used. For example, some organization want two decimal point while some required 4 decimal point. So if update decimal point at extended data type it update all fields where In our case we need to extended data Type, one for Earning code and one for Earning Group code,  For description fields we used the Out of the box field.

Now we have to create two extended data type .

2016-08-22_21-09-01


Currently I am creating objects with AL extension. So I added a extended Data type of EDT String type and name it ALEarngingCode.  Clicking on Add. A new Extended will be added in Visual studio project. Double click on it and It will open in Designer window. Right click on it and open property window and set its size properties and 20.

Size

Similarly, you can create ALEarningGroupCode


extendedDataType


Enum:

Similar there is enum is basically name of literal for example if we have Week days and enum then Sunday , Monday…. Saturday are literals.  In our current example we need Earning type as Fixed or Variable.

AddNewEnumBase

Double click on it and describe its detail on designer window


Add new Element


Double click and update Name and label.

Add name and label

Similarly add one more element

newElements


Tables.

Now we have to add new tables.


Now we explore some important properties of Tables in

Table types.  We can define regular table in database or required temporary table. Temporary table stay in memory until its related object stay in memory. There are two type of Temporary tables.

In memory or Temp db, In memory are usually used in report. Temp db type are used when larger data and larger processes are instantiated.

In current example we use the regular tables.


Now add new tables First we create ALEarningGroup and then AlEarningCodes.

Add new item in visual studio and select table from add new Item dialog.

New Table


Set table name as as AlEarningCodeGroup, right click on table object in designer window solution explorer and open set table type as regular.

TypeGroup


Now add two fields  with EarningCode and Description of string type


Fields


EarninCodeGroup


DescriptionProperties


Now expand field group and add new group Named to Grid and drag both fields into it

EarnCodingDetailss


Similarly create another table for EarningCode


Add two fields AlEarningCode and fields EarningCode and description.

earningCodeTable

Now add one more field with type Enum

EnumField

Set its name EarningcodeType  and set its enum Type to AlEarningCodetype, We created this enum type in previous steps.

EnumSelection


Now add one more field with real type and set its


EarnCodeAmountCur


similarly create a Field group name Grid and drag all fields there.

EarnCodeTableee


Add one more string type for EarningCodeGroup we will map this field with Earning Code table for primary and foreign key relationship.

WithEarningCodeGroup

Indexes – are a way to speed up retrieval of data from a table


There are three types of Index in New Dynamics Ax.

A primary Index. This will provide the unique key to each record.  And field used in primary index used as primary or alternative key for table.

Second one is Clustered and not Clustered which are not scope of this post, we will discuss them in later post.

A clustered index organizes the data in the table in the order of the index.

Non-Clustered index is some kind of reference stored somewhere else to pointed to data. Example of the book index, placed at the end of book, reference of sorted title with page number.

Now we create Index in AlEarningCodeGroup table and then AlEarningCode

EarningCodeGroup

Update the following properties to    Alternate Key Yes, Allow Duplicates to now and set its name as idxEarnGode p


Index

Now drag EarningCodeGroup Under index.


IndexGroup

Now open table properties and add following  update Primary Index  to IdxEarningGrpCode and also select

IndxGroupProperties

Similar create index in ALEarningCodes

EarningCodeTableIndex


Table Relationship

There are two types of relationship in new Dynamics ax.

The first relationship type is called a normal relationship.  A normal relation is used to specify a relation without any conditions.

Another type of relation is called a foreign key relation.  This is used to specify a correspondence between a foreign key field in the present table to the primary key field in another parent table.  Foreign key relations are usually set on a child table.

In our current Scenario, we want to we want EarningGroup code as reference in EarningCode table. For this we expand relationship node of AlEarningCode and add new Relation based on Primary key relation

PrimaryRelation

Updates relation Name and also select related table

RelationProperties


Save it again right click and Select Normal relation


PrimaryKeyRelationDetails


Click on Related Field fixed.

FieldSelectionInRelation

Now from selected screen select both related fields.

Save It compile, so Tables will be synchronizing to database.


In next post we will build simple data entry forms on these two tables.


water mark in SSRS report Dynamics Ax 2012.

August 4, 2016 by alirazazaidi

Hi, all very small tip today, Recently I have to add water mark in one of custom report.

In SSRS for Dynamics Ax 2012, we can achieve water mark by adding background image in report body.

Water mark image should be small in size and used as background Image. If you use high in size image, Report will threw errors on deployed at server.

This water mark can hide and show with ssrs expression.

So complete real word requirement will be Print report with water mark if certain criteria meets, other wise print report normal report.


At SSRS side right right  click on report Body and click on Body Properties.

2016-08-04_11-38-16

From property window, select fill, select file the image source “embedded” and import file.

Import

After import file will be shown as report explorer


Duplicate

Now add following expression  to show report display water mark or not.


=IIf(Fields! DuplicateCopy.Value=1,”Duplicate3″,””)

Customization in New Dynamics AX (AK 7) Part 3- Form and Table Extensions.

July 30, 2016 by alirazazaidi


In new Dynamics Ax, the extensions are created for extension. Previously we use overlay or overwrite change in Out of the box Dynamics Ax object. For example, if we have to add some fields or modification we are overlay or adding changes in original Object. Object is overwrite in configured layer. But in new Dynamics Ax we create extensions. And we added changes in extension. And run time all these extension run as single object.


This is post is third in series, you can also view previous two posts as follow.

Customization In New Dynamics Ax (AX 7) Part 1 – Creating New Model

http://tech.alirazazaidi.com/customization-in-new-dynamics-ax-aka-7-create-new-module/


Consider the scenario, that we writing our custom payroll and here is customer wants direct two 3 fields in Worker details.

  • National Identification Number.
  • Passport Number.
  • Passport Expire date.


For this we create extensions and add required fields in table. So expand Tables in Application explorer.     Right click on WorkerPersonalDetail table and click on extension.

Table extension2


New extension is created and double click on it a
ExtensionDetails


Before that Right click on Project and set Data Base Synchronize properties true.

Visual Studio Properties


New added two string of length 20 character and added expire date and set extended data type of FromDate.

GroupDetails

Add new group

NewGroup


Set properties

PasportGroup

Drag new fields in it.

GroupDetails

Now build project to synchronized to data base.


Now expand Forms and HcmWorker and creates it extension.

FormExtension


Double click on form extension and open it in designer


Expand


Expand he deign portion until you reach the control, where you want to add required field. for example I want to add New fields in PersonDetail section.

ExpandDesigner


Expand profile Tab page and add new group as NIC and Passport.

FormNewGroup

Set its data source and data group as follow

New Fields

Save and Run Project by Ctrl+ F5.

Detail Page


On click and edit mode


Edit


Now we add values and save them

Values Save

Customization in New Dynamics Ax (Aka 7) Part 2- Create New Module

July 26, 2016 by alirazazaidi

This post is continuity of

Customization In New Dynamics Ax (AX 7) Part 1 – Creating New Model

In Dynamics New module is a Menu,


In this post we are Creating A new module In Dynamics where we add complete implementation.


So first step to create a menu Item

CustomMenu

Double click on menu and open it in design area,


Designer


and then right click on it and update its name and label as follow

MyCustomPayrollProperties

Now add new Menu item,

menuDisplay


and Set its form properties to HCMWorker.


MenuDisplayProperties


Now drag open again menu in Design screen and drag display menu from solution explore and save it.

Drag


Now expand the Main menu in AOT and right click on it and click on generate Extension in current project

Extension


You can see new extension in with MainMenu.Extension in solution explorer.

New Extension In Solution Explorer


Double click on It and open it in designer and then right click on it to create a new menu reference


NewReference


ReferenceMenuName


Rename reference menu and set its menu properties to Menu which we create in previous step.


ReferenceProperties


Because we are doing this is post is as introduction, so we set display menu target to HCMWork set it as starting object in Visual studio project.


VisualStudioProject

Now compile, and Run Project With Ctrl+F5.

You can find our custom menu is appeared in Main menu.

MainMenu


Customization In New Dynamics Ax (AX 7) Part 1 – Creating New Model

July 26, 2016 by alirazazaidi

Currently I am explore my Dynamics Development Skills in new Dynamics AX (Aka AX 7). So I decide to write series of post.

So first post is about creating Model and visual studio project.

Open Visual studio but did not create project, first step is Create new model. For this click on Dynamics AX menu and click on Create Model.

2016-07-25_1-24-11


Suppose we write our custom payroll so I wrote Model name with payroll.


Write some something in Model Description.

2016-07-25_1-35-16

In next step select Application suit.

Application Setup

Select and click on next.


Let this step to complete it, it will ask you to create a new Visual studio Project Select that option to create a new project, set its name Custom Payroll.

Dynamics Ax solution


Employee hiring process (recruitment process) in new Dynamics Ax (Aka AX 7).

July 16, 2016 by alirazazaidi


Suppose we have to hire a Ax Dynamics Ax Technical consultant in new Dynamics AX (AKA).

There are multiple ways to do that, but we follow these steps.

2016-06-04_10-09-57

For this we have follow following steps. We explore, Job creations, we create skills, education and certification required for this job, later we create position and attach it to job. Than create a recruitment project where we mentioned who is HR Manager, who is recruiter and create a new application and hire the required person.


We can divide the whole process into following parts

  1. Create a new job
  2. Create a position and associate with job
  3. Create a new recruitment project for job.
  4. Hire a new worker against Recruitment Project.


 Create  a new Job.

2016-06-04_11-36-23

After successful login


and from menu open the HR module

2016-06-04_11-44-22


and expand it and click on Jobs.

Job


On click  a new web page opens, that shows the list of jobs present in Dynamics Ax. Now Click on new button.

Job list page

In a new Job detail page, enter, Dynamics Ax consultant in job , In description, mentioned “Dynamics AX techno Functional Consultant” And Title select Consultant. You can also set

Job details

You can also Expand Skills fast tab and add new skill, If skill is not available for example in my current scenario, X++ and supply chain is not preset so on skill text box right click and click on view details.

Add new Skills

You have to add rating also the same way.


New skills Rating


When skills are added, I select them in skill section.

Details

Next step is to add certification, Here requirement is that Person must have certification.

McP Certification

So right click on certification and create new certification and then select it.

MCP selection


Add new Education, suppose we require to person at least Graduate. So select graduation.

Bsc Computer


Now we have to add three task, that belongs Customization, integration and code.

Skill selection


Save the job from top menu and close the job

If we see on list page, we find our new job is listed there


New job is created


.


Create the new position


Now second step is Position creation and attach job with it.

From menu, select position.

Position Menu


On list page, from top menu, Click on new

New position


Select Job we created in last step.

New Position detail Page


You find the now position associated with job in position

Create

New position is listed on list page

New Position List page


Create a Recruitment Project.


Now go back to Main menu and create a new Recruitment Project


Recuriement Project Menu


Form list page create new recruitment Project by clicking on new at top menu.

New Recuritment Job


Select Previously Created Job and save the Recruitment project.

Recruitment Project selection


From top menu click on and start the Recruitment Project

Click on start


Hire new employee against recruitment project

New recruitment project is started, we can receive application against this

Start Project


From top menu click on applications.

Create Application Menu


Select the applicant name, In my current scenario, required Applicant name was not exists in ERP. So I right click on Name field and click on View Details.

New Applicant


From New party page enter the Required name and create a new party.

New Person detail


After that save and select newly created party as new applicant.  Right click on top menu. And hire new worker.

Application Status and


If select employee from menu.


333d


Click on Hire button to create new worker, the applicant successfully Hired against job.


One time Vendor or supplier Functionality in new Dynamics Ax (Aka Dynamics Ax 7)

April 13, 2016 by alirazazaidi

Dynamic Ax provide the option to create purchase order against one-time vendor or supplier. It means one-time vendors can transact only once.

If you create a new purchase order, you find this option at the top of vendor creation form.


There is possibility that we can create multiple one time vendors or supplier against normal supplier. For that we can select vendor in Invoice account.

2016-04-14_0-47-55


2016-04-14_0-54-28


Dynamics Ax provide a separate sequence number for one-time vendor / supplier. You can set this sequence number form Account payable parameter form.

2016-04-14_1-03-53

Page can not be display -The description for Event ID 110 from source Microsoft Dynamics AX cannot be found new Dynamics AX 7

March 21, 2016 by alirazazaidi

During development suddenly Ax stop working. When I try to connect web url https://usnconeboxax1aos.cloud.onebox.dynamics.com. It shows page can not display. Previously it was working fine.

On Event viewer I found following exception.


The description for Event ID 110 from source Microsoft Dynamics AX cannot be found. Either the component that raises this event is not installed on your local computer or the installation is corrupted. You can install or repair the component on the local computer.


If the event originated on another computer, the display information had to be saved with the event.


The following information was included with the event:


AX is shutting down due to an error.

Duplicate metadata element has been detected in multiple modules. Please verify that application is deployed correctly and installed modules are compatible. Following elements are defined in more than one module:

Element AxService/tstColorService is defined in the following modules: ServiceTest, ApplicationSuite


Solution: During development I created artifacts with same name in different models on different occasions. Surprisingly no warning or error appears during development about object of same name already exists in AOT. I open required solution rename artifacts and build solution. AX web application start working again.

Next Page »

Primary Sidebar

About

I am Dynamics AX/365 Finance and Operations consultant with years of implementation experience. I has helped several businesses implement and succeed with Dynamics AX/365 Finance and Operations. The goal of this website is to share insights, tips, and tricks to help end users and IT professionals.

Legal

Content published on this website are opinions, insights, tips, and tricks we have gained from years of Dynamics consulting and may not represent the opinions or views of any current or past employer. Any changes to an ERP system should be thoroughly tested before implementation.

Categories

  • Accounts Payable (2)
  • Advance Warehouse (2)
  • Asset Management (3)
  • Azure Functions (1)
  • Books (6)
  • Certification Guide (3)
  • Customization Tips for D365 for Finance and Operations (62)
  • D365OF (60)
  • Data Management (1)
  • database restore (1)
  • Dynamics 365 (59)
  • Dynamics 365 for finance and operations (138)
  • Dynamics 365 for Operations (174)
  • Dynamics AX (AX 7) (134)
  • Dynamics AX 2012 (274)
  • Dynamics Ax 2012 Forms (13)
  • Dynamics Ax 2012 functional side (16)
  • Dynamics Ax 2012 Reporting SSRS Reports. (31)
  • Dynamics Ax 2012 Technical Side (52)
  • Dynamics Ax 7 (65)
  • Exam MB-330: Microsoft Dynamics 365 Supply Chain Management (7)
  • Excel Addin (1)
  • Favorites (12)
  • Financial Modules (6)
  • Functional (8)
  • General Journal (1)
  • Implementations (1)
  • Ledger (1)
  • Lifecycle Services (1)
  • Logseq (4)
  • Management Reporter (1)
  • Microsoft Excel (4)
  • MS Dynamics Ax 7 (64)
  • MVP summit (1)
  • MVP summit 2016 (1)
  • New Dynamics Ax (19)
  • Non Defined (9)
  • Note taking Apps (2)
  • Obsidian (4)
  • Personal Knowledge Management (3)
  • PKM (16)
  • Power Platform (6)
  • Procurement (5)
  • procurement and sourcing (6)
  • Product Information Management (4)
  • Product Management (6)
  • Production Control D365 for Finance and Operations (10)
  • Sale Order Process (10)
  • Sale Order Processing (10)
  • Sales and Distribution (5)
  • Soft Skill (1)
  • Supply Chain Management D365 F&O (4)
  • Tips and tricks (278)
  • Uncategorized (165)
  • Upgrade (1)
  • Web Cast (7)
  • White papers (4)
  • X++ (10)

Wiki

  • SCM

Copyright © 2026 · Magazine Pro On Genesis Framework · WordPress · Log in