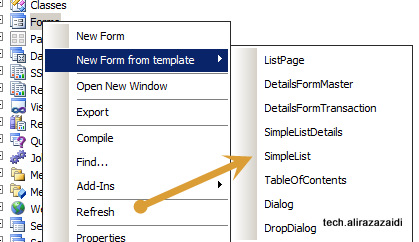
Now we start development of form. First form we will build for Simple list form for Diagnostic table
For this open AOT and right click on Form Node and click on simple list form template

Drag newly created form in Project and rename it “DiagonasisticTable”.

Expand DiagonsisticTable form and Right click on data source node to new Data source. Update name of name and Table name as DiagonsisticTable.

Now expand Designs=> Design Expand=> group Container and select grid

Right click on grid, click on properties window and set these properties
Data Source: DiagonasisticTable
DataGroup: overView

Save the form and right click on form open it. The form will look like similar

If you try to enter duplicate values in Diagnostic number field. Due to unique index on Diagnostic number it did not let you do it.

New create a display menu with Name “MnuDiagonisticTable” and set it object Type to form and object Name as “DiagonisticTable”. Save it.

Now expand Diagonaistictable right click on it and set its “FormRef” property with mnuDiagonisticsTable

This property provides us option of “View Details” on lookup field. We see its function in Master detail form.
Detail form:
Now we create a detail from for patient table. Create a new form and add data source and set its Name and DataSource value to Patienttable.

Right click on PatientTable data source and set “InsertIfEmpty” to false

Now expand Designs and add new action tab, inside button group add three command buttons.
Rename them into “btnNew”, “btnEdit” and “btnDelete”. And from property window set their command to new, edit and delete.

You can also select button Image by update following Properties

Now expand Designs=>Design under ActionTab add a new Tab. Set Tab style property to fast tab.
Add new tab page in Tab and set is width and height value as follow

Add new group control set its width and height like above one and column property to 2.
And set is data source to patientTable and Data group property to overview

Now form structure will look like

Now open the form let’s see how it look like

Test the form and click add remove entries

Parent child form:
Now we expand patientTable form to Parent child form.
Now expand DataSource of node of PatientTable form and add a new data source. And set its table property to AdmissionTable, Name to AdmissionTable, and Set its JoinSource to PatientTable


Now expand the form designer and add a new tab Page under patient tab and add new action pane There Set DataSource Property of ActionTab to AdmissionTable so all control inside this action tab works for AdmissionTable. In Button group add three command buttons and set their name “BtnNewAdmission”, “BtnEditAdmission” and “BtnDeleteAdmission”. After this set there command property to “New”,”Edit” and “Delete”.

Now add a grid in this tab and set its data Source to AdmissionTable.

Drag and drop fields from AdmissionTable data Source to grid

Now open the form lets how it look like

You can see that here admission Date is greater than Discharge Date, for this we have to add some validation rules, which are not part of current post. We let it go.

If you right click on diagnostic number field in grid, from pop up menu view detail option leads us Diagnostic table form.

This option comes due to we add menu Item in table properties in one of above step I am again adding its picture here

Now we create a new Display Menu Item “MenuPatientTable” and set its object property to

Now we create a List page for Patient and attached Patient detail form with it.
For list page template we cannot attach table in data source for this we can create a Static Query Object. This Query Object will use as data Source in Form
First we have to create a Query. Re Name it to PatientQuery and form its DataSource add Patient table

Expand PatientTable source in data table and right click on fields and set its field property to yes

After saving you will find all fields in Query

Now open AOT and right click on Form Node. From pop up menu select form template and then select list page.

Now search form with similar CopyOfSysBPStyle_ListPage Name. Drag it to your project and rename it to PatientListPage

Now expand Patient List page and set data source and sets property to PatientQuery. This query we created in previous step

This will result in all tables in query in forms data source. By default these table have create and edit to no.

Expand Designer node of Form and select grid and set its dataSource property to Patient and drag and drop required fields from PatientTable_1 data Source to form.

Now drag and drop required fields from data source to grid


Now we are going to attached PatientDetail form with Patient
Now we add the Add, edit, delete and view functionality which leads the PatientDetail form
Expand the action tab in form and right click on menuItemButton “newbutton”

Set following properties

Expand next button group “MaintainedGroup” and and Open property window of EditButton

From Property window set following fields
DataSource = “PatientTable_1”
OpenMode =”Edit”
CopyCallerQuery=”Yes”
MenuItemName =”mnupatientTable”

Now select mnuItemButton “ViewButton”

From Property window and set
DataSource = “PatientTable_1”
OpenMode =”View”
CopyCallerQuery=”Yes”
MenuItemName =”mnupatientTable”

Now expand grid in form and set following property to MenuItemButton “ViewButton”, which we set in above step, so when we click on grid, detail form opens

Now run the form and lets try all functions.
Now create a new Display menu Item Say “MnuPatientListPage”. Set its form Property as follow

Suppose That is hospital registration development is part of Accounts Payable module.

Expand the menu Accounts Payable module expand common.
Add a new menu Item or drag drop existing menu item Common Set its following properties

Now Open Ax client and open Account Payable area page

